Datasets#
Ultralytics Platform datasets provide a streamlined solution for managing your training data. After upload, the platform processes images, labels, and statistics automatically.
A dataset is ready to train once processing has completed and it has at least one image in the train split, at least one image in either the val or test split, and at least one labeled image. The dataset header shows a Ready badge when all three conditions are met, and a Not Ready badge otherwise — click the badge to see exactly which condition is missing.
Collect Images with Agents#
Use Agents to add images to a dataset when a model detection meets a condition, such as confidence within a chosen range. Connect the condition to a Dataset block and select a destination you can edit. Images arrive unlabeled in the train split; existing copies are skipped. Review and label them with the existing annotation editor.
Upload Dataset#
Ultralytics Platform accepts multiple upload formats for flexibility.
If you already have datasets in Roboflow, use Integrations to import them directly — no manual export or re-upload needed. Data in Google Cloud Storage, Amazon S3, or Azure Blob Storage can be used in place through Cloud storage. Enterprise workspaces can use On Premise to index and train on local data without sending pixels to Platform.
Supported Formats#
| Format | Extensions | Notes | Max Size |
|---|---|---|---|
| JPEG | .jpg, .jpeg | Most common, recommended | 50 MB |
| PNG | .png | Supports transparency | 50 MB |
| WebP | .webp | Modern, good compression | 50 MB |
| BMP | .bmp | Uncompressed | 50 MB |
| TIFF | .tiff, .tif | High quality | 50 MB |
| HEIC | .heic | iPhone photos | 50 MB |
| AVIF | .avif | Next-gen format | 50 MB |
| JP2 | .jp2 | JPEG 2000 | 50 MB |
| DNG | .dng | Raw camera | 50 MB |
| MPO | .mpo | Multi-picture object | 50 MB |
Video Codec Support#
The file extension alone isn't enough: a video can still fail if its codec cannot be decoded during processing.
H.264 video in an MP4 container has the broadest decoder support and is the safest choice. If a video won't process, re-encode it with FFmpeg:
ffmpeg -i input.mov \
  -c:v libx264 -pix_fmt yuv420p \
  -c:a aac -movflags +faststart \
  output.mp4
Preparing Your Dataset#
The Platform supports Ultralytics YOLO, COCO, LabelMe JSON, semantic PNG masks, depth datasets, Ultralytics NDJSON and Labelbox NDJSON, and raw (unannotated) uploads:
Use the standard YOLO directory structure with a data.yaml file:
my-dataset/
├── images/
│   ├── train/
│   │   ├── img001.jpg
│   │   └── img002.jpg
│   └── val/
│       ├── img003.jpg
│       └── img004.jpg
├── labels/
│   ├── train/
│   │   ├── img001.txt
│   │   └── img002.txt
│   └── val/
│       ├── img003.txt
│       └── img004.txt
└── data.yaml
The YAML file defines your dataset configuration:
# data.yaml
path: .
train: images/train
val: images/val

names:
    0: person
    1: car
2: dogRaw: Upload unannotated images (no labels). Useful when you plan to annotate directly on the platform using the annotation editor.
You can also upload images without explicit split folders. Platform respects the active split target during upload. If no split target is set and the upload leaves val empty — or with fewer than two paired maps for depth — non-classify datasets automatically move train images to val so the dataset is immediately trainable. Classification datasets are skipped because they use directory-based splits. You can always reassign images later with bulk move-to-split or split redistribution.
The format is detected automatically: datasets with a data.yaml containing names, train, or val keys are treated as YOLO. Datasets with COCO JSON files (containing images, annotations, and categories arrays) are treated as COCO. Without a COCO file, per-image LabelMe JSON files (containing shapes and imagePath) are read as LabelMe annotations. .ndjson exports are imported as Ultralytics NDJSON, or as Labelbox exports when their rows carry a data_row key. Datasets with only images and no annotations are treated as raw.
When an archive contains several YAML files, Platform prefers standard names (data.yaml, data.yml, dataset.yaml, dataset.yml) closest to the archive root. Keep one clearly named YAML per archive to avoid ambiguity.
Label files in Pascal VOC XML format are detected but their annotations are not imported — the images upload without them, and five or more images kept in a folder such as images/ or JPEGImages/ also pick up a class named after that folder. Platform warns you before the upload starts ("Pascal VOC labels detected"). Convert VOC XML to YOLO or COCO first; see format conversion tools.
If labels reference class IDs but no class names are supplied, Platform remaps the IDs to a dense 0-indexed sequence and names each class after its source ID (class0, class3, …), which you can rename later in the Classes tab.
For task-specific format details, see supported tasks and the Datasets Overview.
Upload Process#
To create a dataset:
- Navigate to
Annotatein the sidebar - Click
New Dataset - Pick a data source tab (see Data Sources below)
- Add a name — the URL slug is derived automatically and can be edited — plus an optional description
- Select the task type (see supported tasks), an optional license (see available licenses), and visibility (public or private)
- Click
Create & Uploadfor local files,Create & Importfor a URL or connected source, orCreate Datasetto start empty
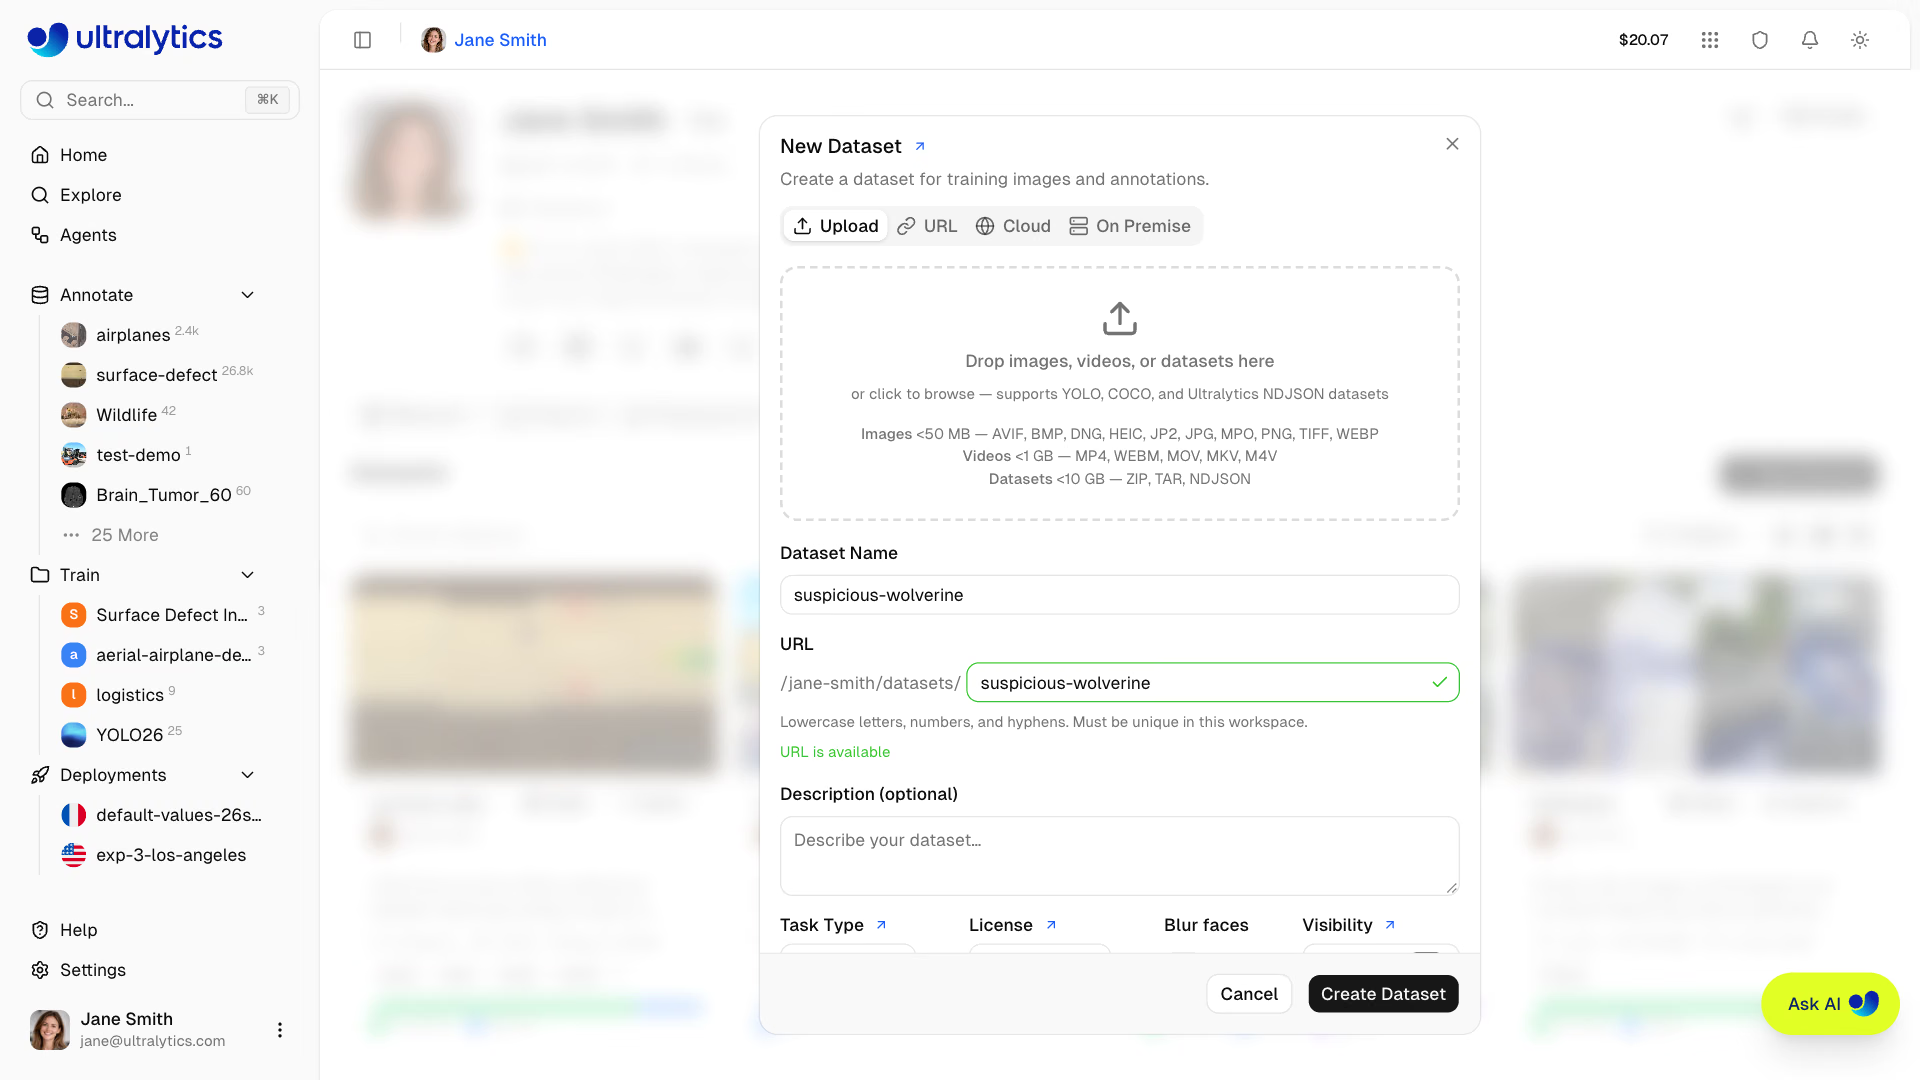
To add files to an existing dataset, open its dataset page and either drag the files onto the gallery or click the upload icon in the page header. The upload icon opens your browser's native file picker directly because the dataset task is already defined.
Data Sources#
The New Dataset dialog offers four sources:
| Source | Description |
|---|---|
| Upload | Drag files in or browse for them — images, videos, archives, or NDJSON |
| URL | Paste a direct link to a .zip, .tar, .tar.gz, .tgz, or .ndjson file; Platform downloads and ingests it server-side |
| Cloud | Use data in place from Google Cloud Storage, Amazon S3, or Azure Blob Storage (Pro and Enterprise) |
| On Premise | Index and train on data that never leaves your own machines via On Premise workers (Enterprise) |
Depth datasets can only be created from Upload or URL; the Cloud and On Premise tabs are disabled for the depth task.
A URL import is capped by both your plan's per-upload limit (10 GB Free / 20 GB Pro / 50 GB Enterprise) and your remaining storage quota, whichever is smaller. The link must be publicly reachable over HTTP or HTTPS and end in a supported extension.
Before the Upload Starts#
Platform validates your files in the browser before uploading anything, so common problems surface immediately rather than after a long transfer. Archives are checked for corruption, emptiness, password protection, and YAML syntax errors, and oversized files are listed by name.
Two dialogs may then appear:
When a ZIP archive declares class names and your dataset already has classes, the Map classes dialog lists one row per incoming class. Map each one to an existing class or create a new class, or clear its Include checkbox to skip it. Matching names (ignoring case, except for one- and two-character names) are preselected, and the annotations of skipped classes are not imported.
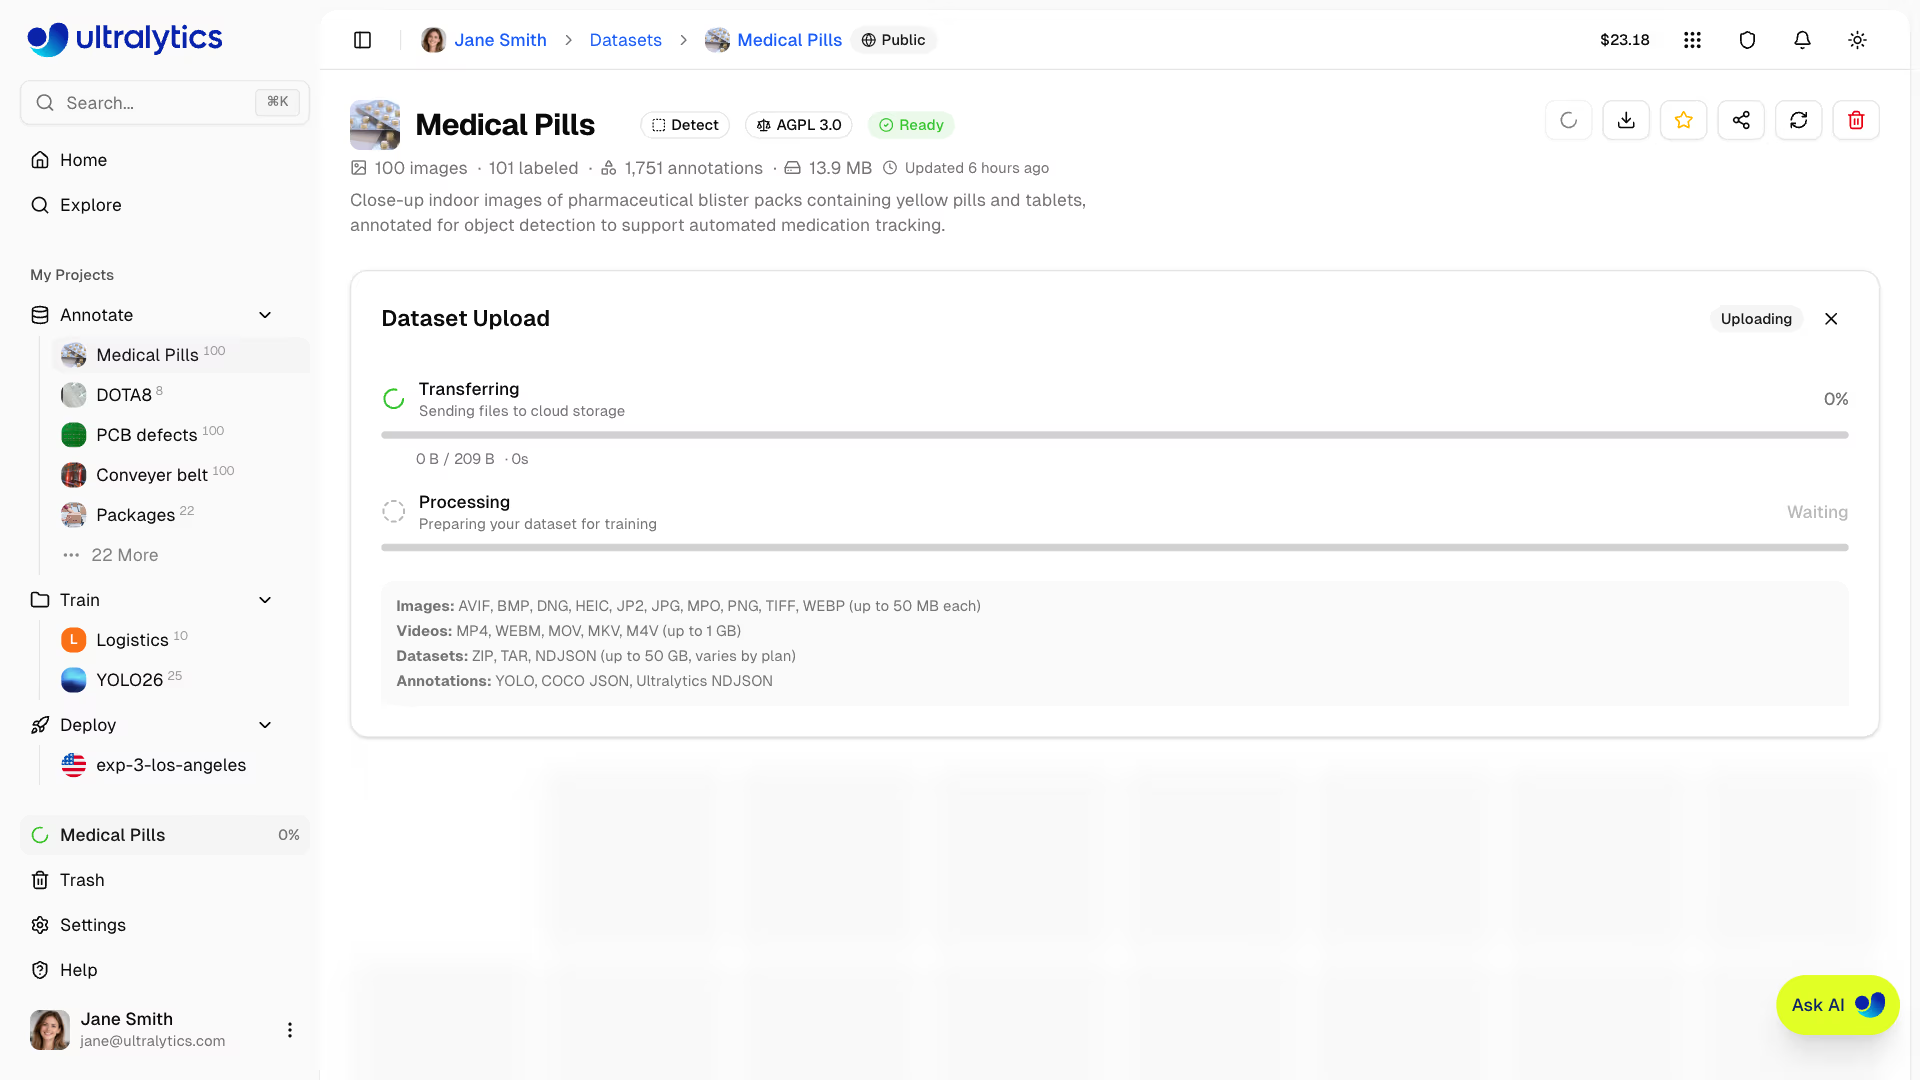
After upload, the platform processes your data automatically:
graph LR
    A[Upload]:::start --> B[Validate]:::proc
    B --> C[Normalize]:::proc
    C --> D[Thumbnail]:::proc
    D --> E[Parse Labels]:::proc
    E --> F[Statistics]:::out

    classDef start fill:#4CAF50,color:#fff
    classDef proc fill:#2196F3,color:#fff
classDef out fill:#9C27B0,color:#fff- Validation: Format and size checks
- Normalization: Large images resized (max 4096px, min dimension 28px), grayscale expanded to RGB, transparency flattened onto white, and EXIF orientation applied; TIFF originals are stored as uploaded
- Thumbnails: 256px WebP previews generated
- Label Parsing: YOLO, COCO, LabelMe, and Ultralytics or Labelbox NDJSON labels extracted
- Statistics: Class distributions and image dimensions computed
TIFF originals are always stored byte-for-byte, and AVIF and WebP originals are when no resize or color change is needed. Everything else is re-encoded — WebP sources stay WebP, and all other sources (JPEG, PNG, BMP, HEIC, JP2, DNG, MPO, and resized or color-changed AVIF) become JPEG at quality 92. Your original filename and source extension are retained as metadata.
Validate Before Upload
You can validate your dataset locally before uploading:
from ultralytics.data.utils import check_det_dataset

check_det_dataset("path/to/data.yaml")Images must be at least 28px on their shortest side. Images smaller than this are rejected during processing. Images larger than 4096px on their longest side are automatically resized with aspect ratio preserved, except TIFF originals, which are stored as uploaded.
Browse Images#
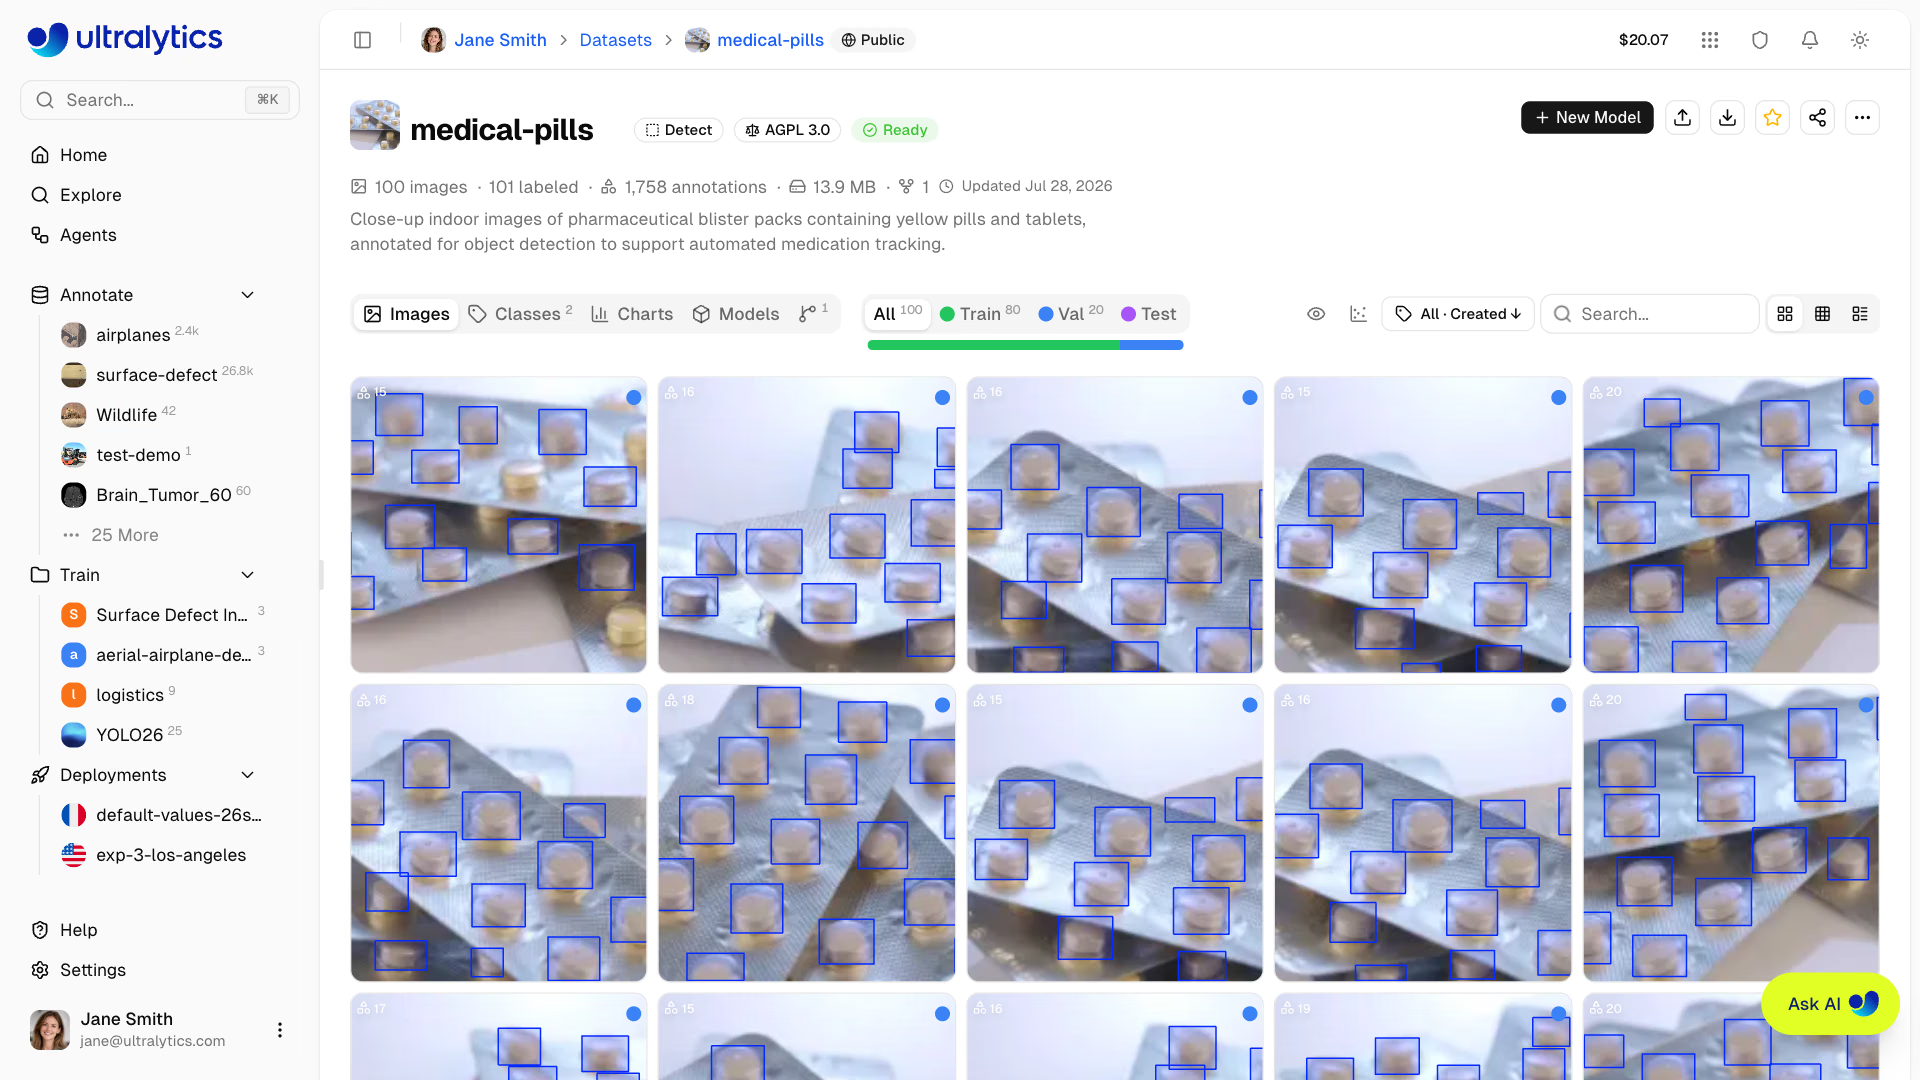
View your dataset images in multiple layouts.
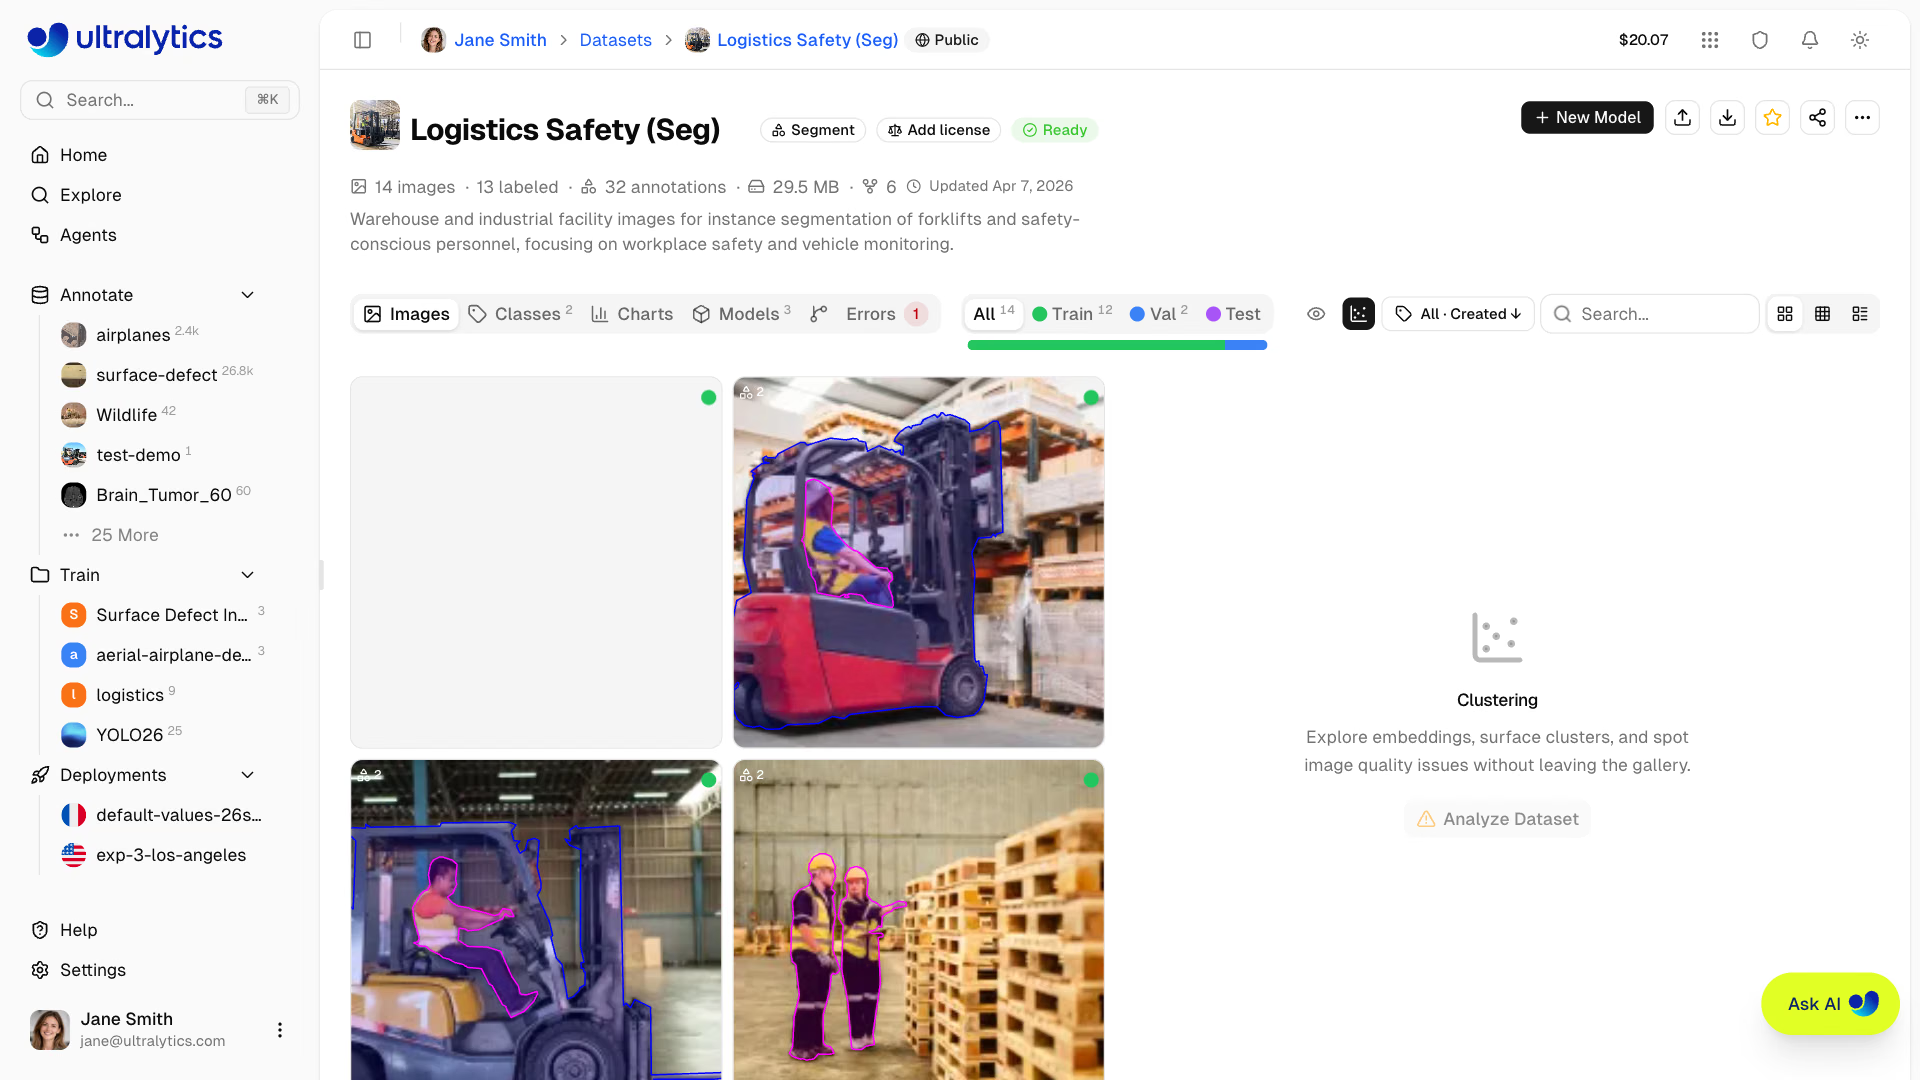
Open the Clustering panel from the gallery toolbar to explore your dataset as an interactive 2D scatter plot.
| View | Description |
|---|---|
| Grid | Thumbnail grid with annotation overlays (default) |
| Compact | Smaller thumbnails for quick scanning |
| Table | List with thumbnail, filename, dimensions, size, split, classes, and label counts |
Sorting and Filtering#
Images can be sorted and filtered for efficient browsing:
Each option toggles between ascending (↑) and descending (↓):
| Sort | Description |
|---|---|
| Created ↑/↓ | Upload order (default ↓) |
| Name ↑/↓ | Filename alphabetical |
| Height ↑/↓ | Image height in pixels |
| Width ↑/↓ | Image width in pixels |
| Size ↑/↓ | File size on disk |
| Annotations ↑/↓ | Annotation count per image |
For datasets over 100,000 images, the name, width, height, and size sorts are hidden to keep the gallery responsive. Created and annotation-count sorts remain available.
Use the Annotations filter set to Unannotated to quickly find images that still need annotation. This is especially useful for large datasets where you want to track labeling progress.
The search box sits at the right of the gallery toolbar and filters every view mode — grid, compact, and table. It matches the image filename (the file extension is optional), the name of any class annotated in the image, and custom metadata keys, scalar values, and array entries, so an image named img_0042 with a boat annotation and {"ship_type": "yacht"} metadata is found by searching img_0042, boat, or yacht.
Values nested inside sub-objects are not matched. Pasting a 24-character image ID or 32-character content hash looks up that exact image directly, bypassing the text search.
Results are ordered by relevance: images whose filename, class, or metadata match come first, then up to 1,000 more
images that look like the search, such as forklift near a doorway. Sorting is unavailable while a search is
active, and a search that ends in a file extension skips the look-alike matches.
Fullscreen Viewer#
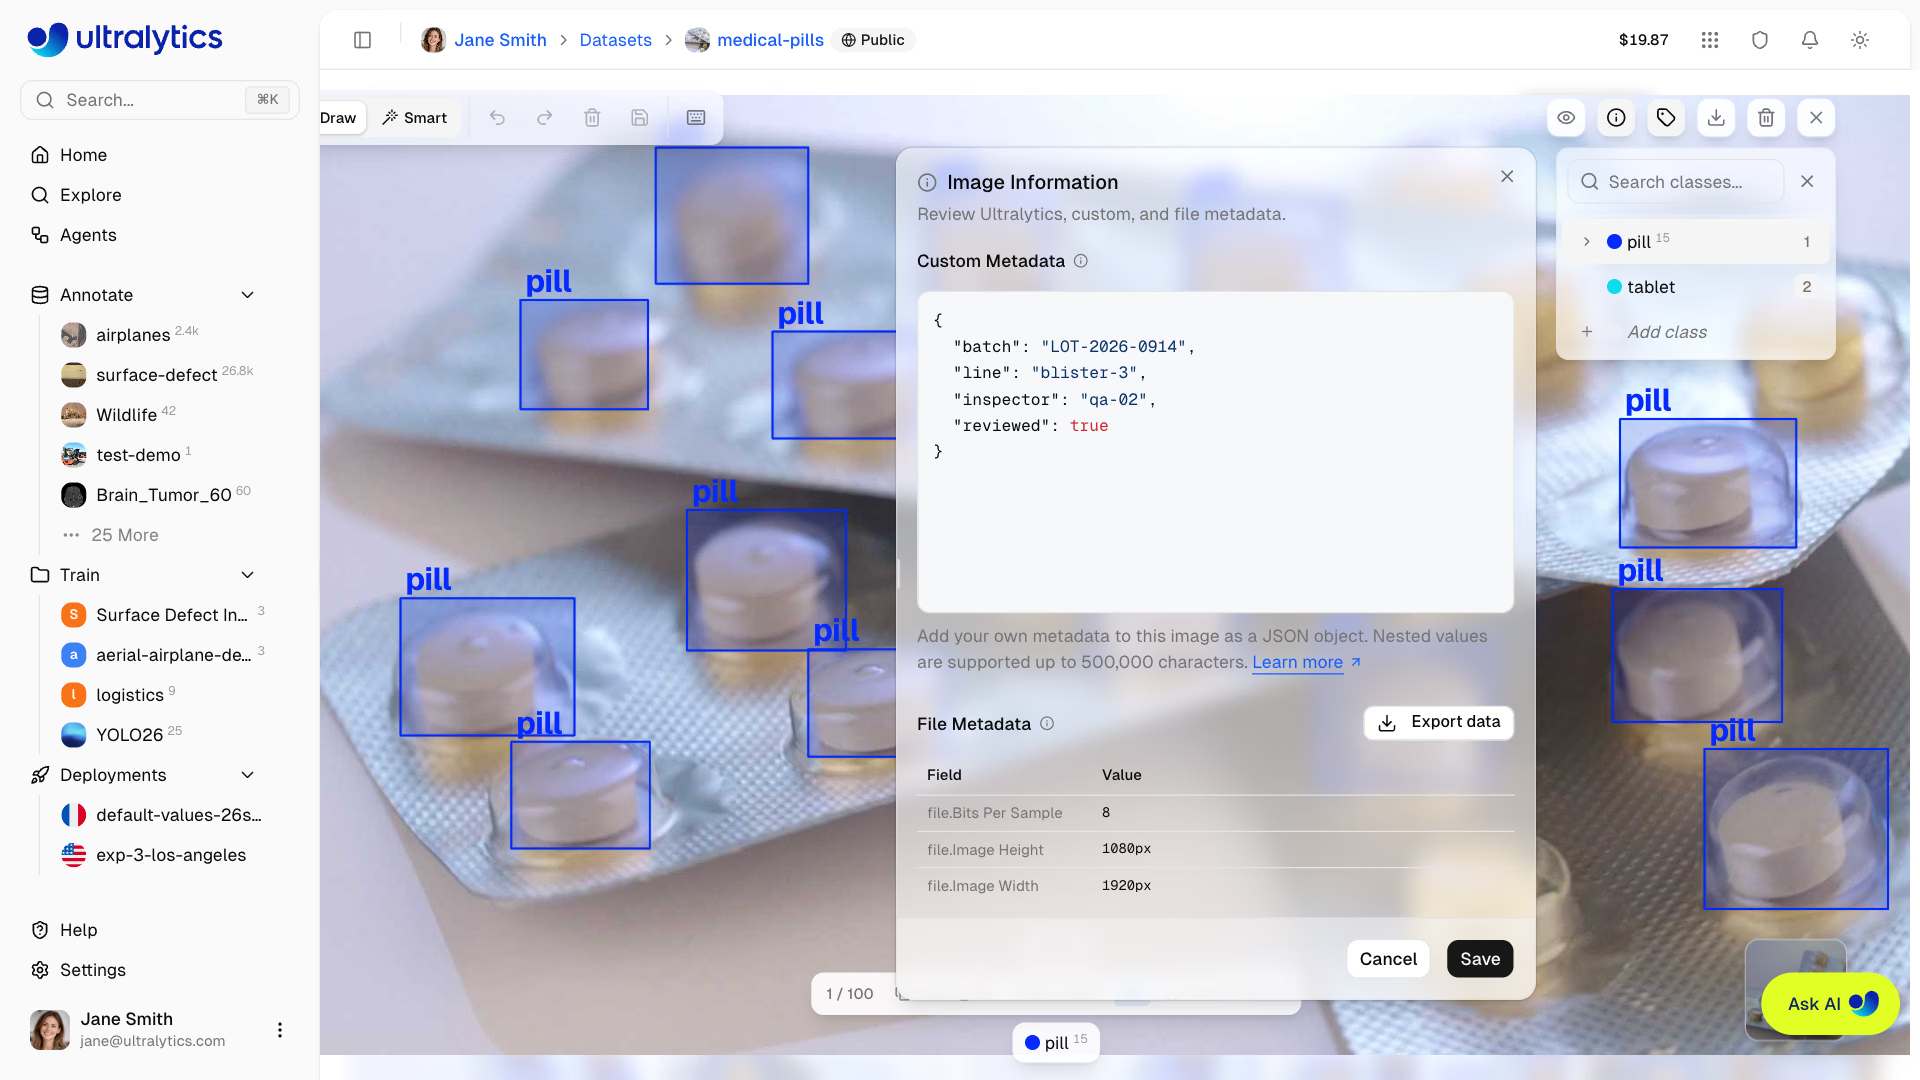
Click any image to open the fullscreen viewer with:
- Navigation: Arrow keys or thumbnail previews to browse
- Image information: Review Platform-generated properties, custom metadata, and embedded file metadata such as EXIF
- Custom metadata: Owners and editors can add or replace a JSON object, including nested values up to 500,000 serialized characters and top-level keys up to 128 characters
- Annotations: Toggle annotation overlay visibility
- Class Breakdown: Per-class label counts with color indicators
- Annotate: When you have edit access, annotation controls are active immediately when the fullscreen viewer opens on desktop
- Blur faces: Right-click an annotation to preview and apply face blurring to the image when available
- Download: Download the original image file
- Delete: Delete the image from the dataset
- Zoom:
Cmd/Ctrl+Scroll,Cmd/Ctrl++, orCmd/Ctrl+=to zoom in, andCmd/Ctrl+-to zoom out - Reset view:
Cmd/Ctrl + 0or the reset button to fit the image to the viewer - Pan: Hold
Spaceand drag, or drag with the middle mouse button, to pan the canvas at any zoom level - Pixel view: Toggle pixelated rendering for close inspection
- Depth curtain: On depth datasets, a draggable divider wipes between the RGB image and its colorized depth map
Filter by Split#
Filter images by their dataset split:
| Split | Purpose |
|---|---|
| Train | Used for model training |
| Val | Used for validation during training |
| Test | Used for final evaluation |
Clustering#
The Clustering panel projects your dataset into an interactive 2D scatter plot where visually similar images sit close together. Use it to surface clusters, spot duplicates and outliers, and inspect how splits or classes are distributed across your data — without leaving the gallery. Open it from the scatter-chart icon in the gallery toolbar on any dataset page. The panel is desktop-only, and viewers without edit access see the icon once the dataset has been analyzed.
Running Analysis#
Start an analysis:
- Open a dataset and click the scatter-chart icon in the gallery toolbar
- Click
Analyze Dataset - Wait for the progress bar to finish — results appear in the same panel
Analysis runs in the background in two stages, Computing embeddings and Clustering, and can take a few minutes depending on the size of your dataset. You can close the panel or leave the page and come back later.
A dataset needs at least 20 and at most 200,000 non-errored images to analyze. Connected datasets backed by cloud or On Premise storage are not supported yet.
Visualization#
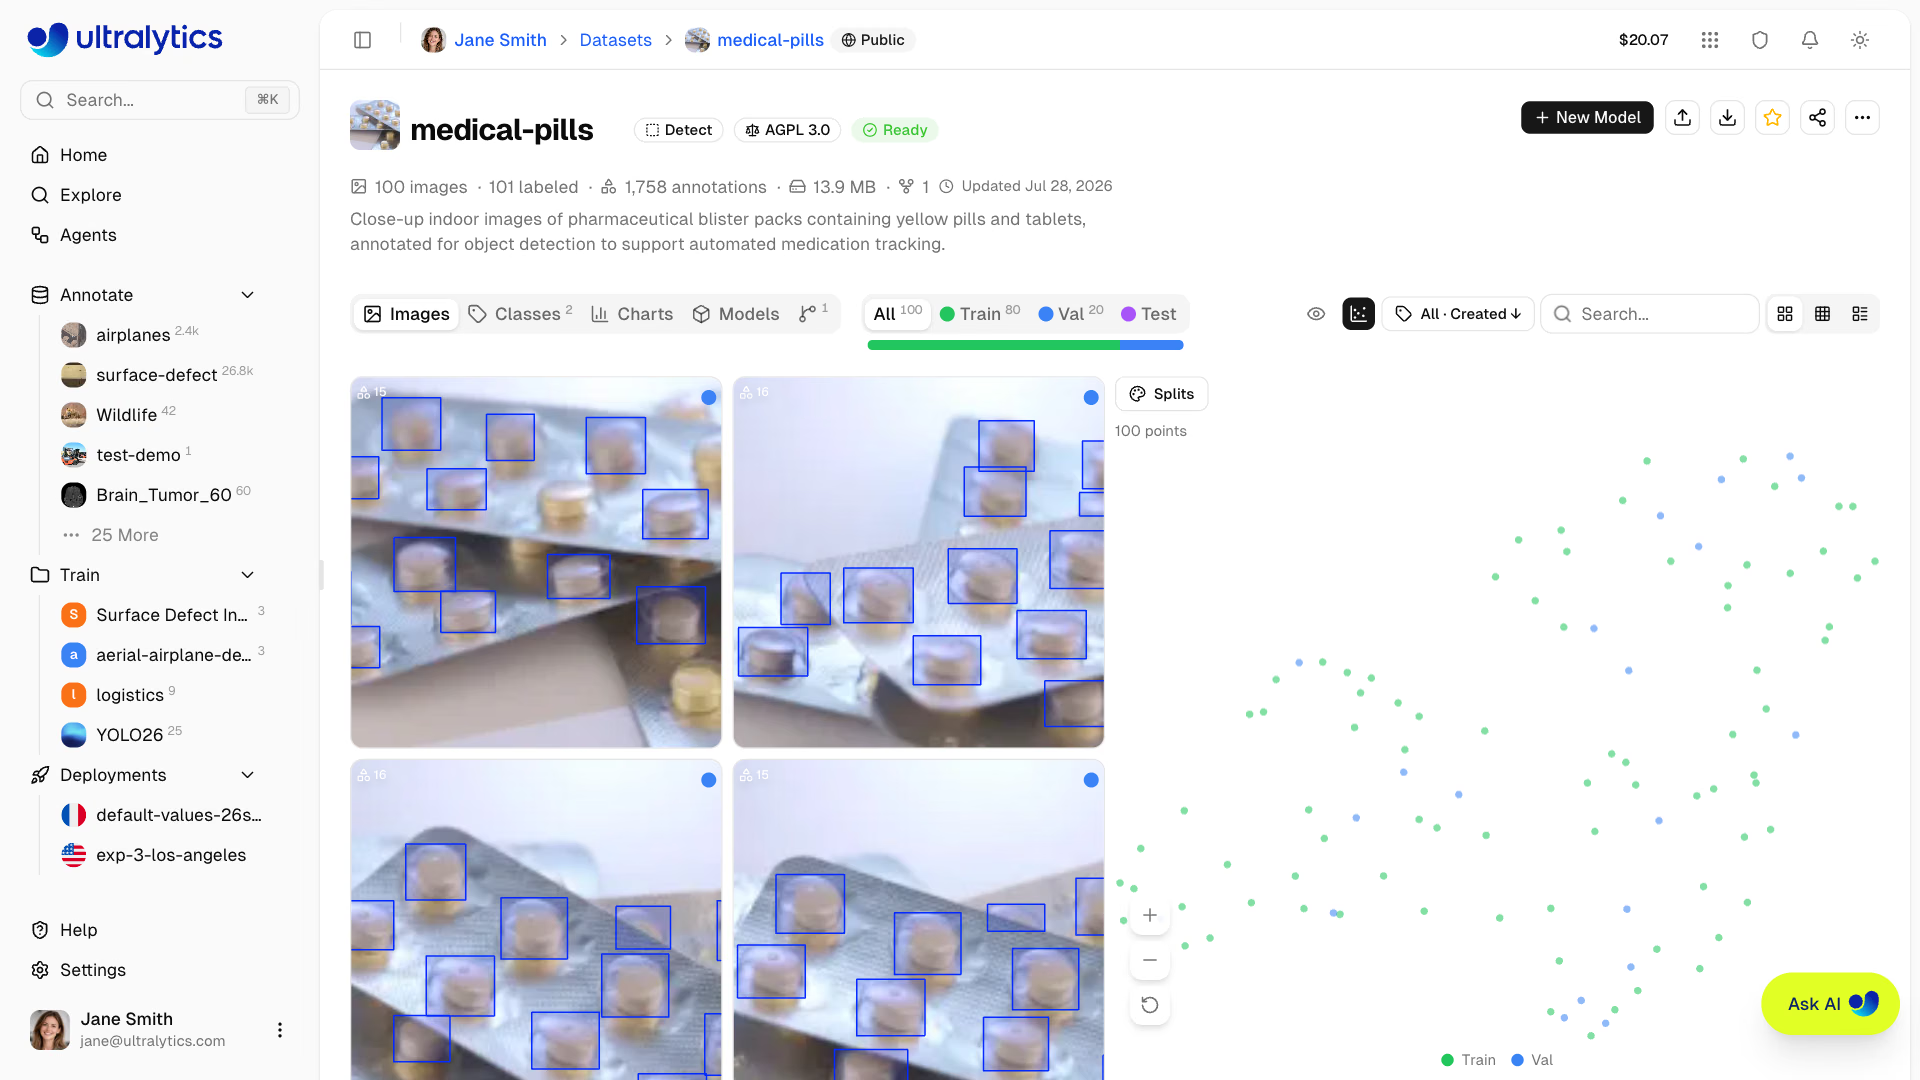
Once analysis completes, the panel shows a 2D scatter of all analyzed images with a legend and a point counter. Gallery filters (split, class, labeled/unlabeled) dim out-of-filter points so you can focus on the subset you care about — the counter then reads visible / total points.
Color By#
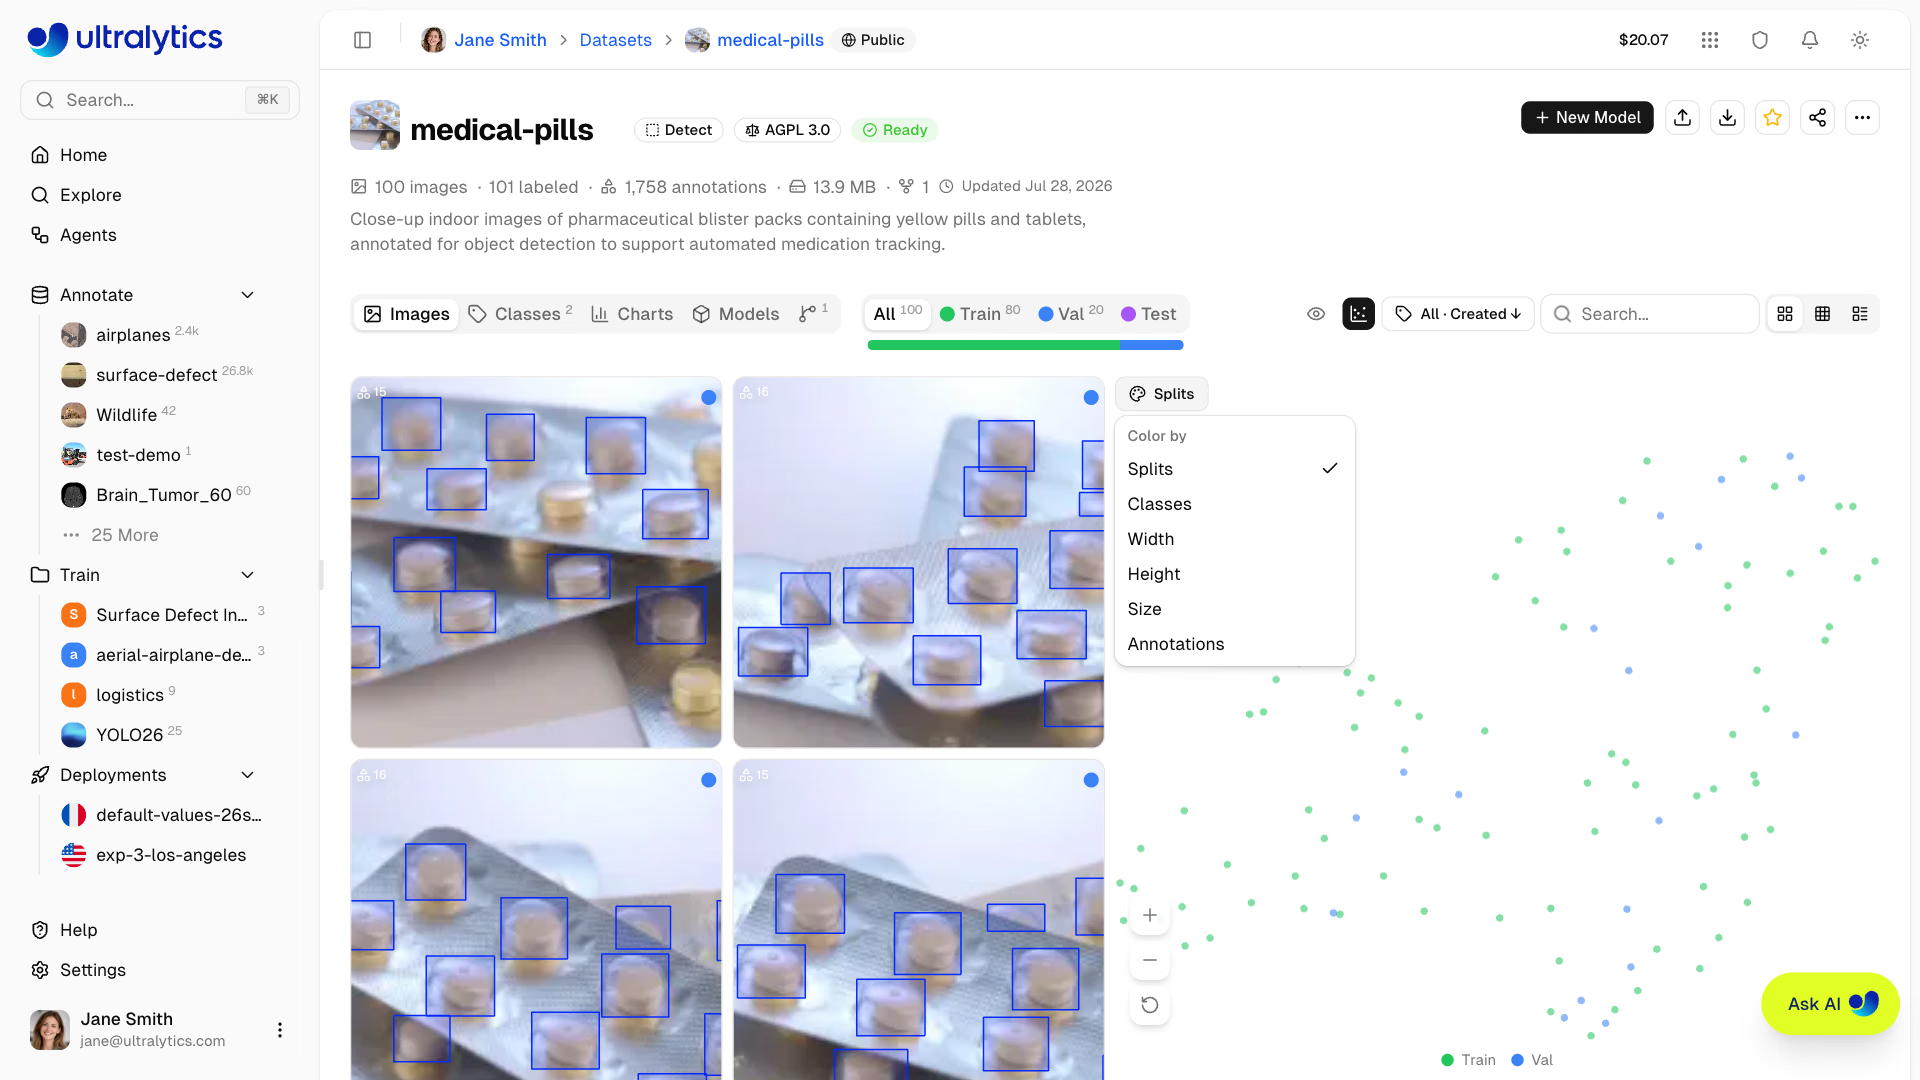
Change how data points are shaded with the Color by dropdown in the panel toolbar. Switch view modes at any time — the plot re-colors instantly so you can see how splits, classes, or image properties are distributed across your clusters:
| Option | Shading |
|---|---|
| Splits | Train / Val / Test |
| Classes | First annotation class on each image |
| Clusters | Visual island in the layout, largest first; Scattered for points outside any island, Not computed for layouts analyzed before this option existed |
| Width | Image width |
| Height | Image height |
| Size | File size |
| Annotations | Number of annotations per image |
Lasso and Click Selection#
Draw a free-form selection around a region to highlight points on the plot, or click a point to select every point drawn in the same color (only that point when coloring by width, height, size, or annotations); click an empty area of the plot to clear the selection. The gallery filters down to the matching images, so you can inspect, relabel, move, or delete them using the usual image operations.
A chip above the chart shows how many points are selected — click the × or an empty area of the plot to clear the selection and return to the full gallery view.
A lasso or click selection resolves to at most 1,000 images. If your selection matches more, Platform shows a sampled 1,000 and suggests drawing a smaller region.
Pan and Zoom#
Navigate large scatters directly from your mouse and keyboard, or with the zoom buttons at the bottom-left of the plot:
| Input | Action |
|---|---|
| Scroll | Pan the plot in 2D |
| Cmd/Ctrl+Scroll | Zoom in or out, anchored at the cursor |
| Hold Space | Switch to drag-to-pan mode |
| Reset button | Return to the full extent of the plot |
Re-analyzing#
If your dataset changes after analysis — new images arrive, or the analyzed count no longer matches the dataset — or the analysis predates the Clusters color option, a Re-analyze button appears at the top of the panel for owners and editors.
Click Re-analyze to recompute embeddings and the 2D projection from scratch.
Find Similar Images#
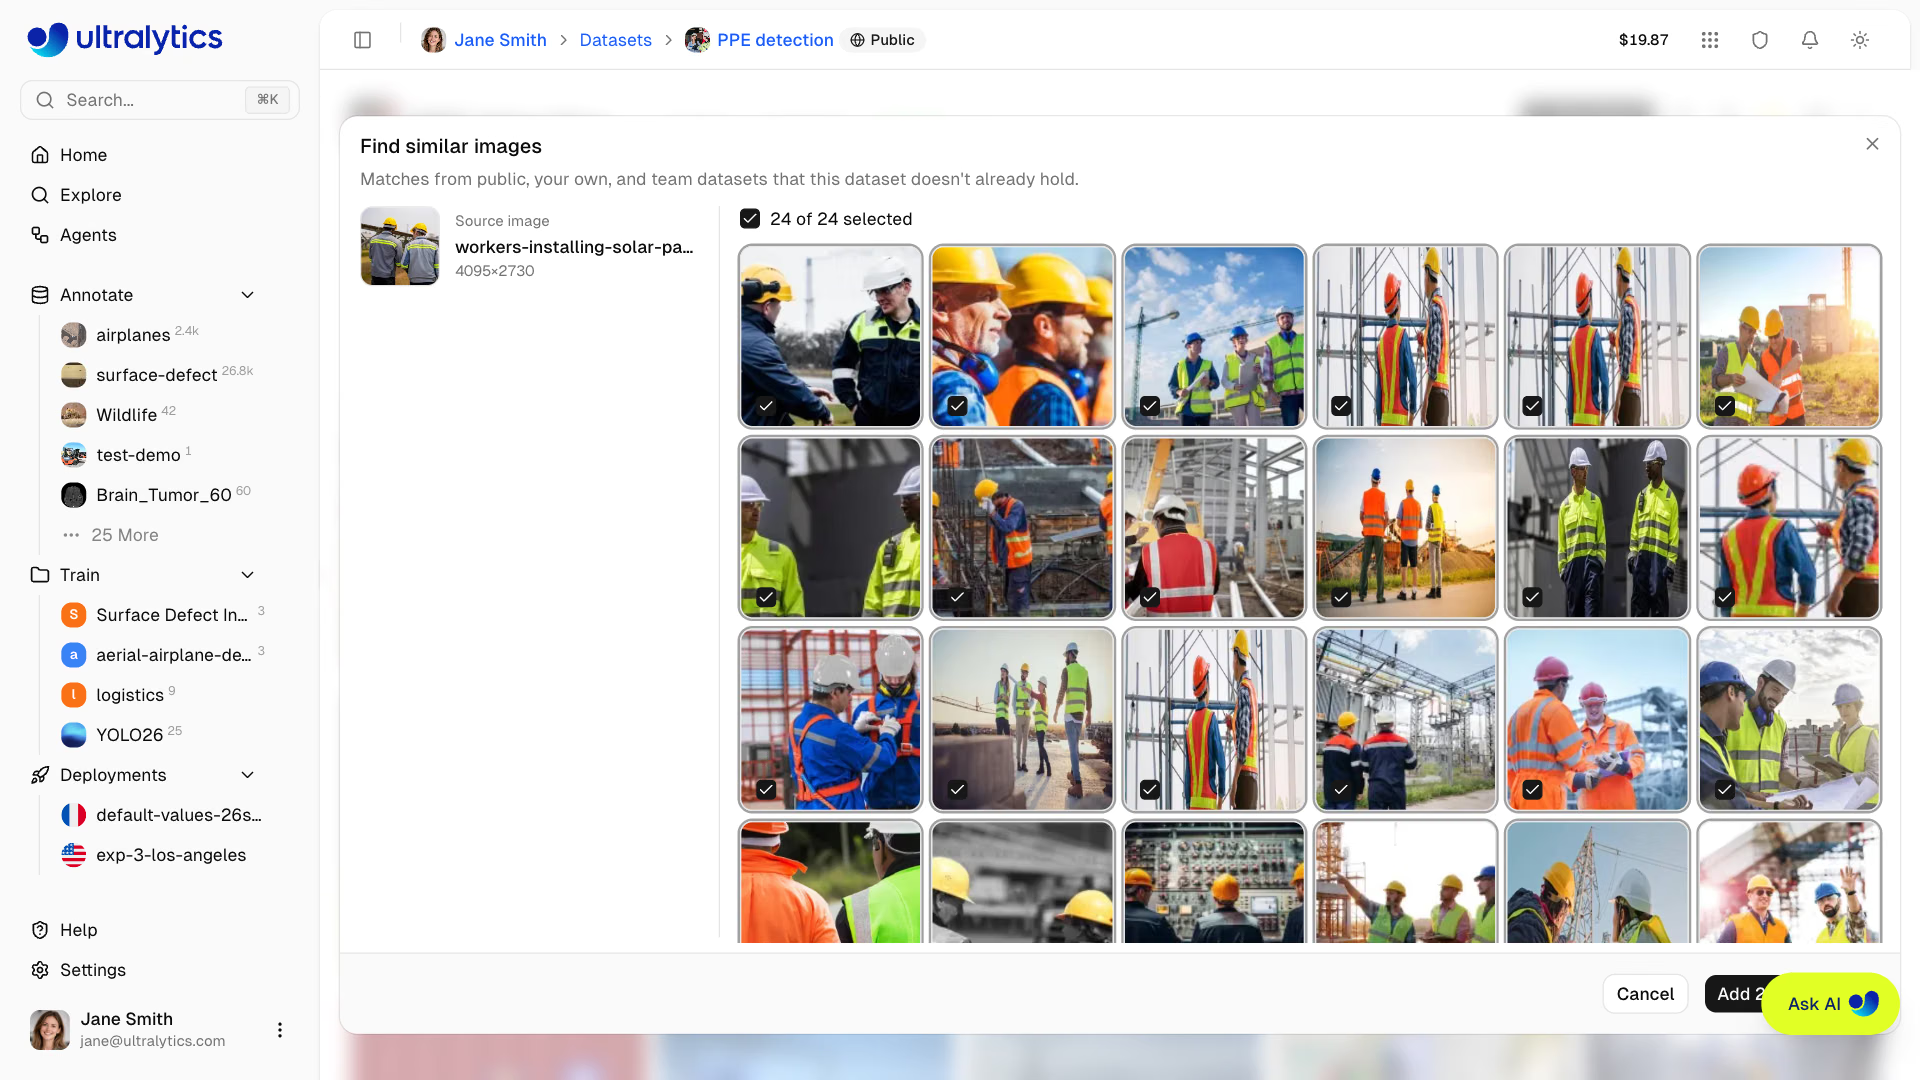
The same embeddings power similarity search across public datasets and your own and team datasets. In a dataset you can edit, right-click an image in Grid or Compact view (or a single selected row in Table view) and choose Find similar images. The dialog shows the source image beside up to 24 of the nearest images, each labeled with its similarity score, excluding images your dataset already holds and copies of the selected image in other datasets. Click an image to preview it full size and see its source dataset, license, and similarity score. Select images with their checkboxes (or select all), then click Add N to dataset: they are added to the train split as unlabeled images, counted against your storage, and ready for annotation.
An image without an embedding — in a dataset not yet analyzed, or added since the last analysis — is embedded when you open the dialog, so you do not need to run a Clustering analysis first. The dialog is unavailable on connected datasets. A model's per-image validation diagnostics run the same search from its worst-performing images.
Dataset Tabs#
Each dataset page can show up to six tabs, depending on the dataset state and your permissions:
Images Tab#
The default view showing the image gallery with annotation overlays. Supports grid, compact, and table view modes. Drag and drop files here to add more images.
Classes Tab#
This tab appears when the dataset has images and its task has classes.
Manage annotation classes for your dataset:
- Class histogram: Bar chart showing annotation count per class, sorted by frequency, with a linear/log scale toggle
- Class table: Sortable, searchable table with index, name, annotation count, and image count
- Edit class names: Click any class name to rename it inline
- Edit class colors: Click a color swatch to change the class color
- Add new class: Use the input at the bottom to add classes
- Merge classes: Select two or more rows and click
Merge into one - Delete classes: Select one or more rows and click
Delete
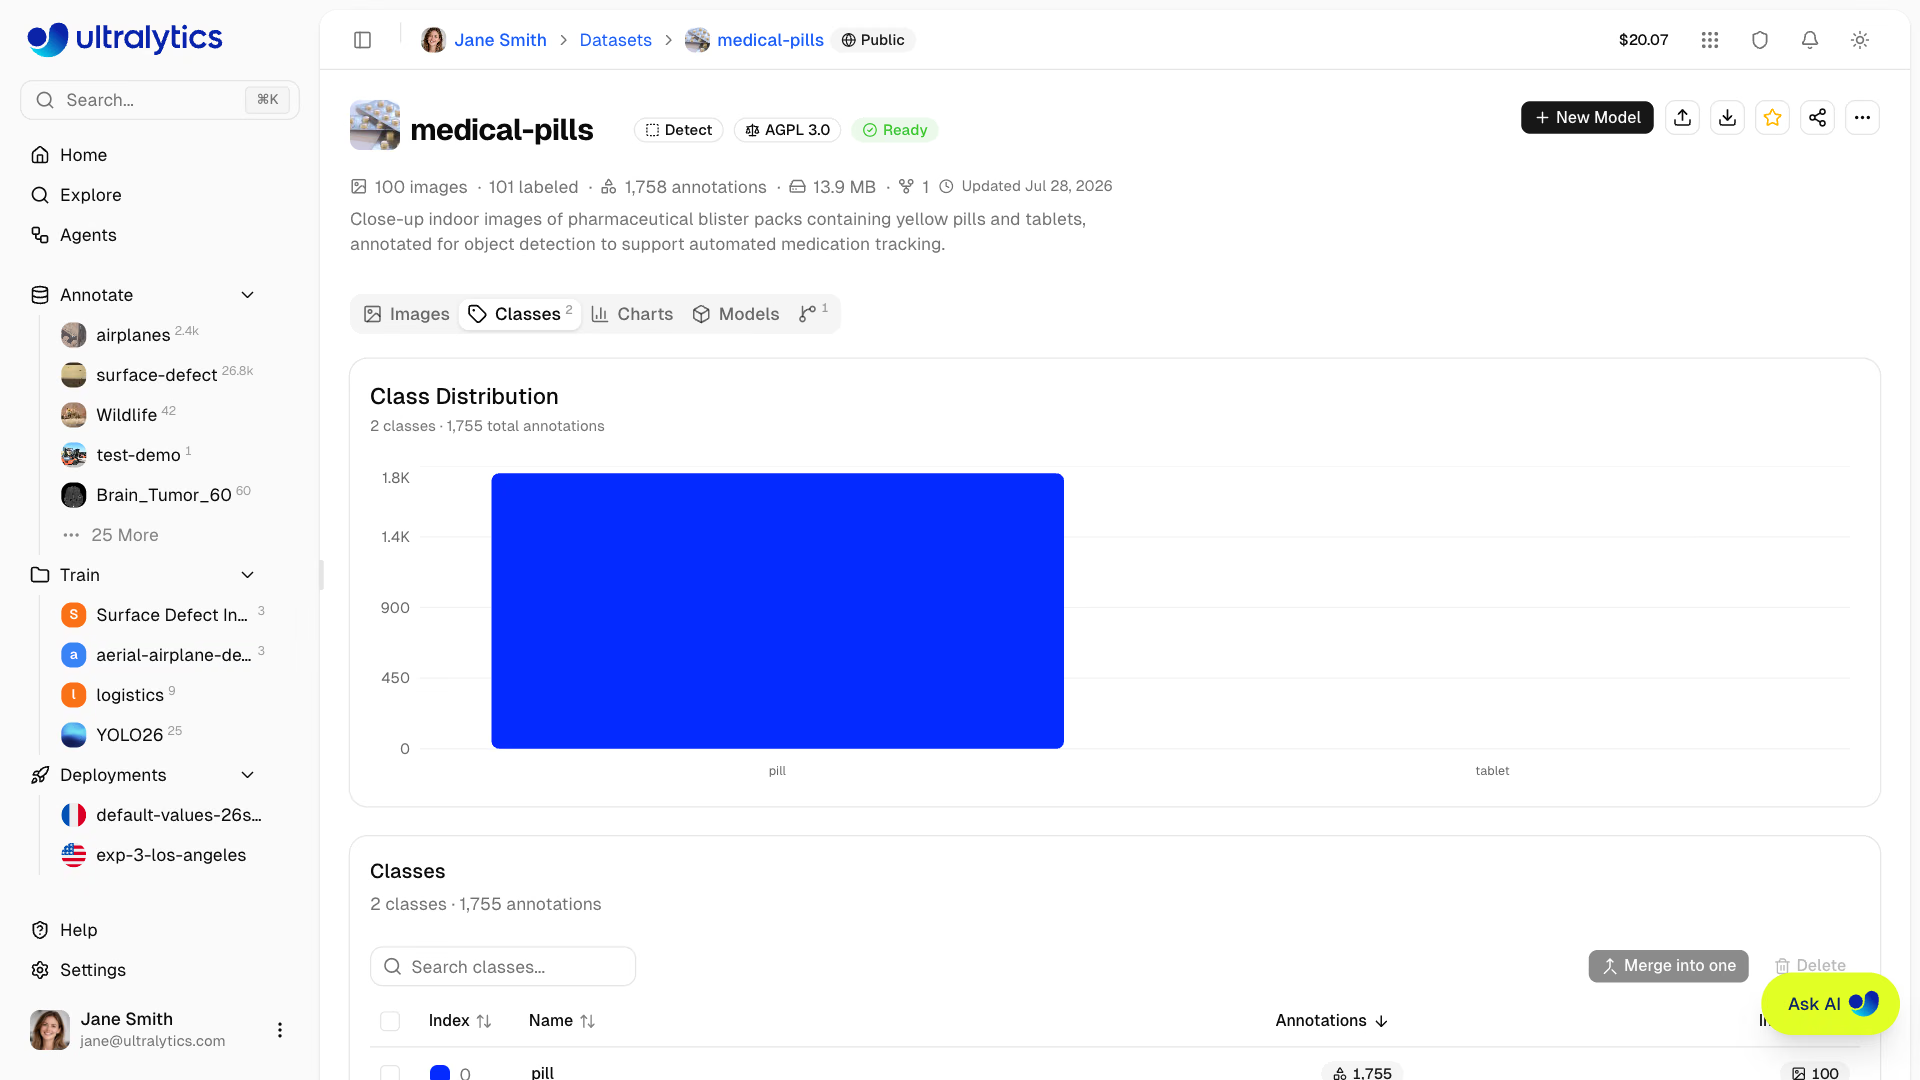
If your dataset has class imbalance (e.g., 10,000 "person" annotations but only 50 "bicycle"), use the Log Scale toggle on the class histogram to visualize all classes clearly.
Merge Classes#
Merging consolidates duplicate or overlapping labels — for example folding car, automobile, and vehicle into one class:
- Select two or more classes using the row checkboxes
- Click
Merge into onein the table header, or right-click the selection - Choose which of the selected classes is the target the others merge into
- Confirm
Every annotation belonging to the source classes is reassigned to the target class, and the source classes are removed. No annotations are deleted, so the dataset's total annotation count is unchanged.
Delete Classes#
- Select one or more classes using the row checkboxes
- Click
Deletein the table header, or right-click the selection - Confirm
Deleting a class removes the class and all of its annotations. For classification datasets the labels are removed but the images remain, becoming unannotated.
Class IDs are positional. Merging or deleting a class shifts every higher class index down to close the gap, so exports and label files written before the change no longer line up with the new indices. Create a version first if you need the old numbering.
Class counts are computed from at most 100,000 images. On larger datasets a note above the histogram reads "Based on a 100,000-image subset of this dataset."
Charts Tab#
This tab appears when the dataset has images.
Automatic statistics computed from your dataset:
Charts appear in this order, and each one is omitted when the dataset has no data for it — a raw image dataset shows no annotation charts, and Points per Instance only appears for segment and pose data:
| Chart | Description |
|---|---|
| Split Distribution | Donut chart of train/val/test image counts and labeled percent |
| Top Classes | Donut chart of the 10 most frequent annotation classes, with the rest as "Other" |
| Image Dimensions | Histogram of image width and height distribution (overlaid) with mean |
| Image File Size | Histogram of image file size distribution |
| Image Dimensions 2D | 2D width vs height heatmap with aspect ratio guide lines |
| Annotation Locations | 2D heatmap of bounding box center positions |
| Image Formats | Distribution of source image formats (JPG, PNG, etc.) |
| Bounding Box Dimensions | Histogram of bounding box width and height (overlaid) |
| Objects per Image | Histogram of annotation count per image |
| Points per Instance | Polygon vertex or keypoint count per annotation (segment/pose) |
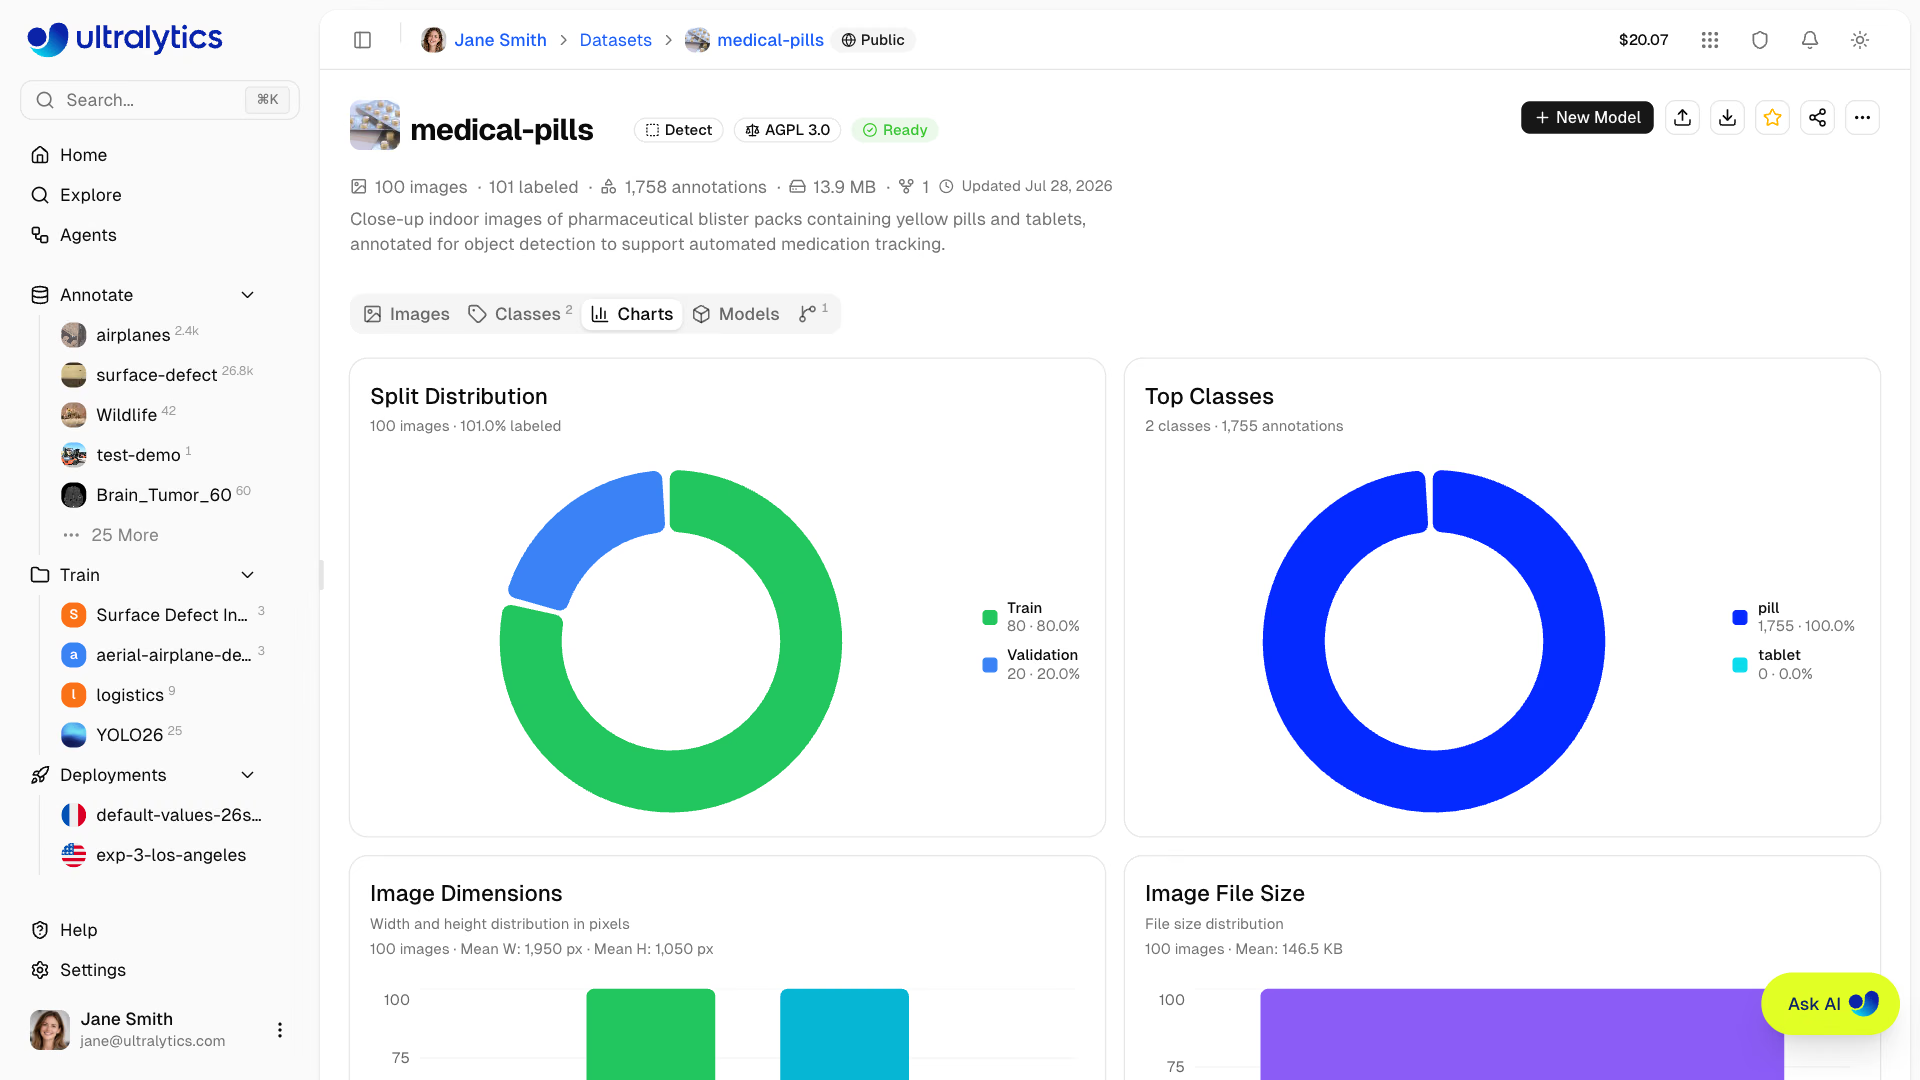
The Platform caches computed statistics and invalidates them when images, annotations, classes, or splits change. On datasets larger than 100,000 images the charts are computed from a 100,000-image subset, noted above the grid.
Click the expand button on any heatmap to view it in fullscreen mode. This provides a larger, more detailed view — useful for understanding spatial patterns in large datasets.
Models Tab#
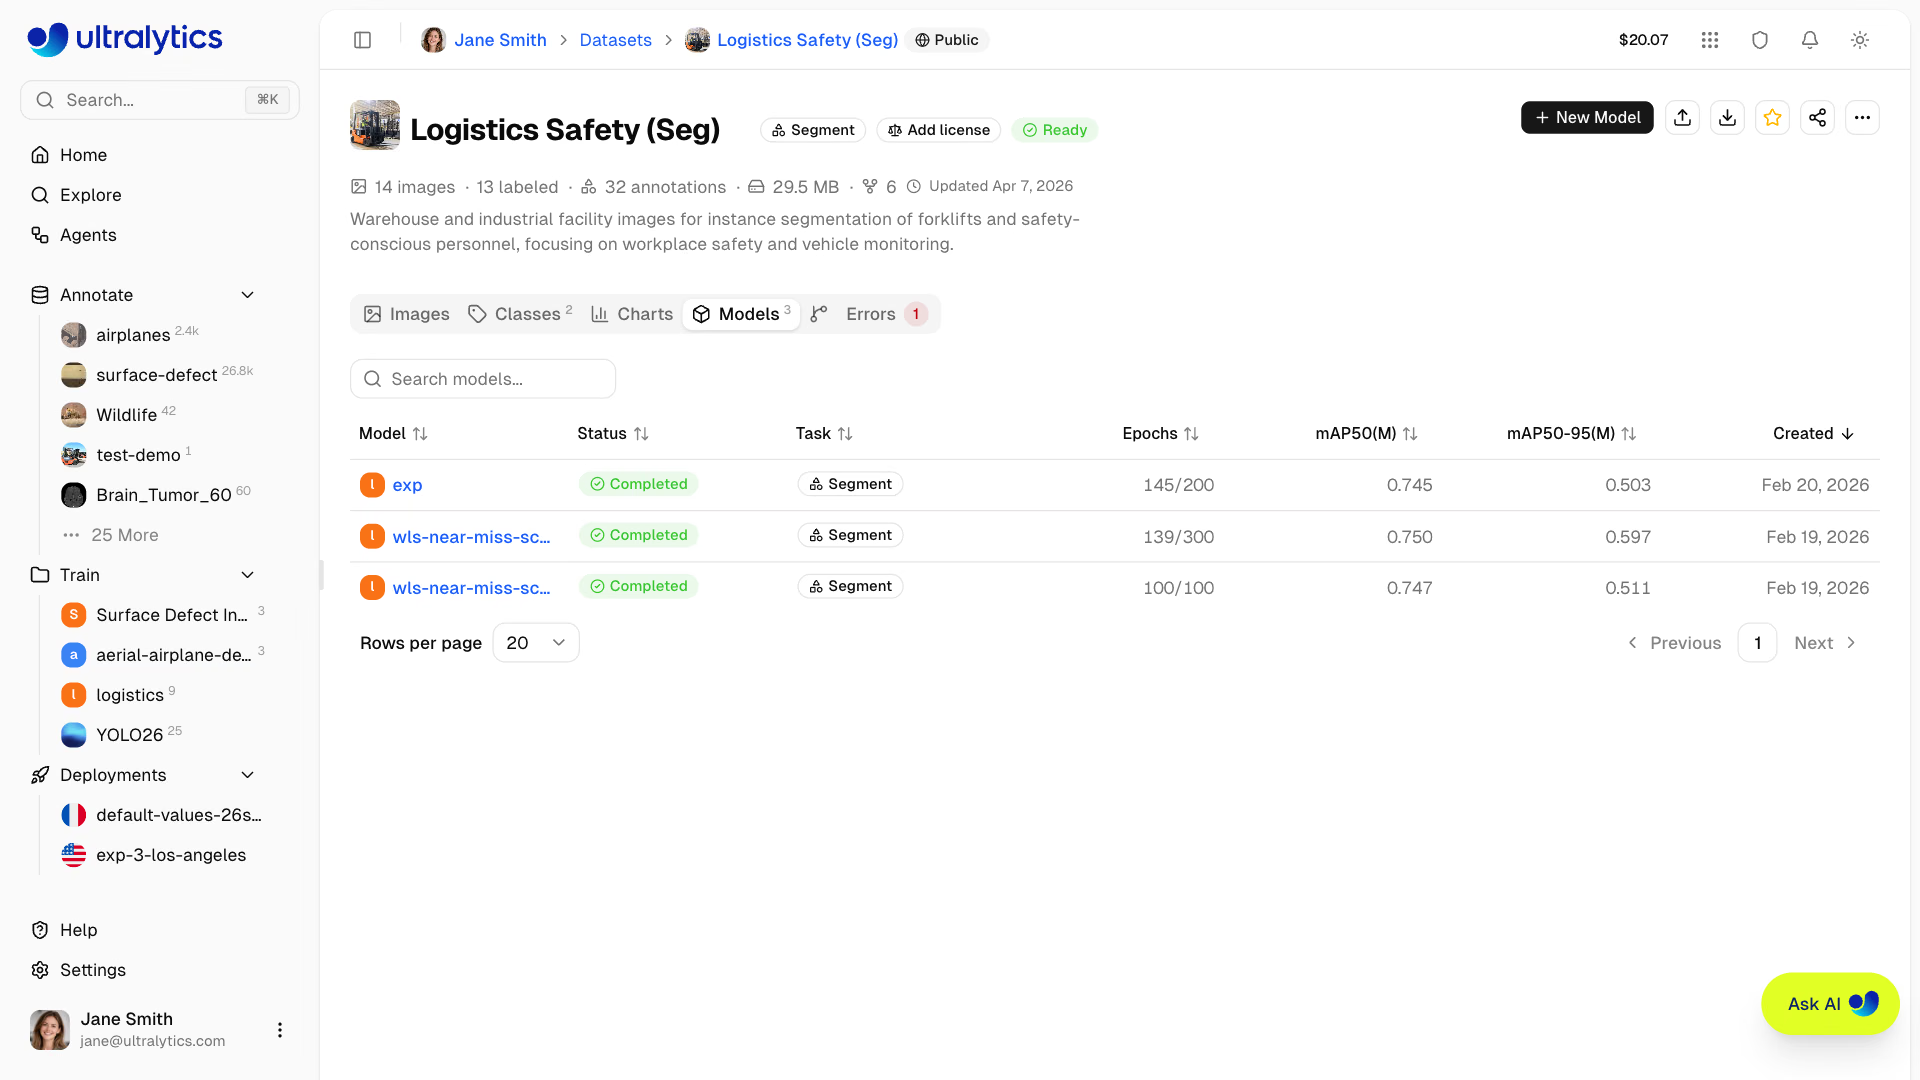
View all models trained on this dataset in a searchable table:
| Column | Description |
|---|---|
| Model | Parent project and model name, with links |
| Version | Immutable dataset version used for training, shown when any listed model used one |
| Status | Training status badge |
| Task | YOLO task type |
| Epochs | Best epoch / total epochs |
| Metrics | Two headline metrics for each task in the table, such as mAP50 and mAP50-95 for detection or Top-1 and Top-5 Accuracy |
| Created | Creation date |
Errors Tab#
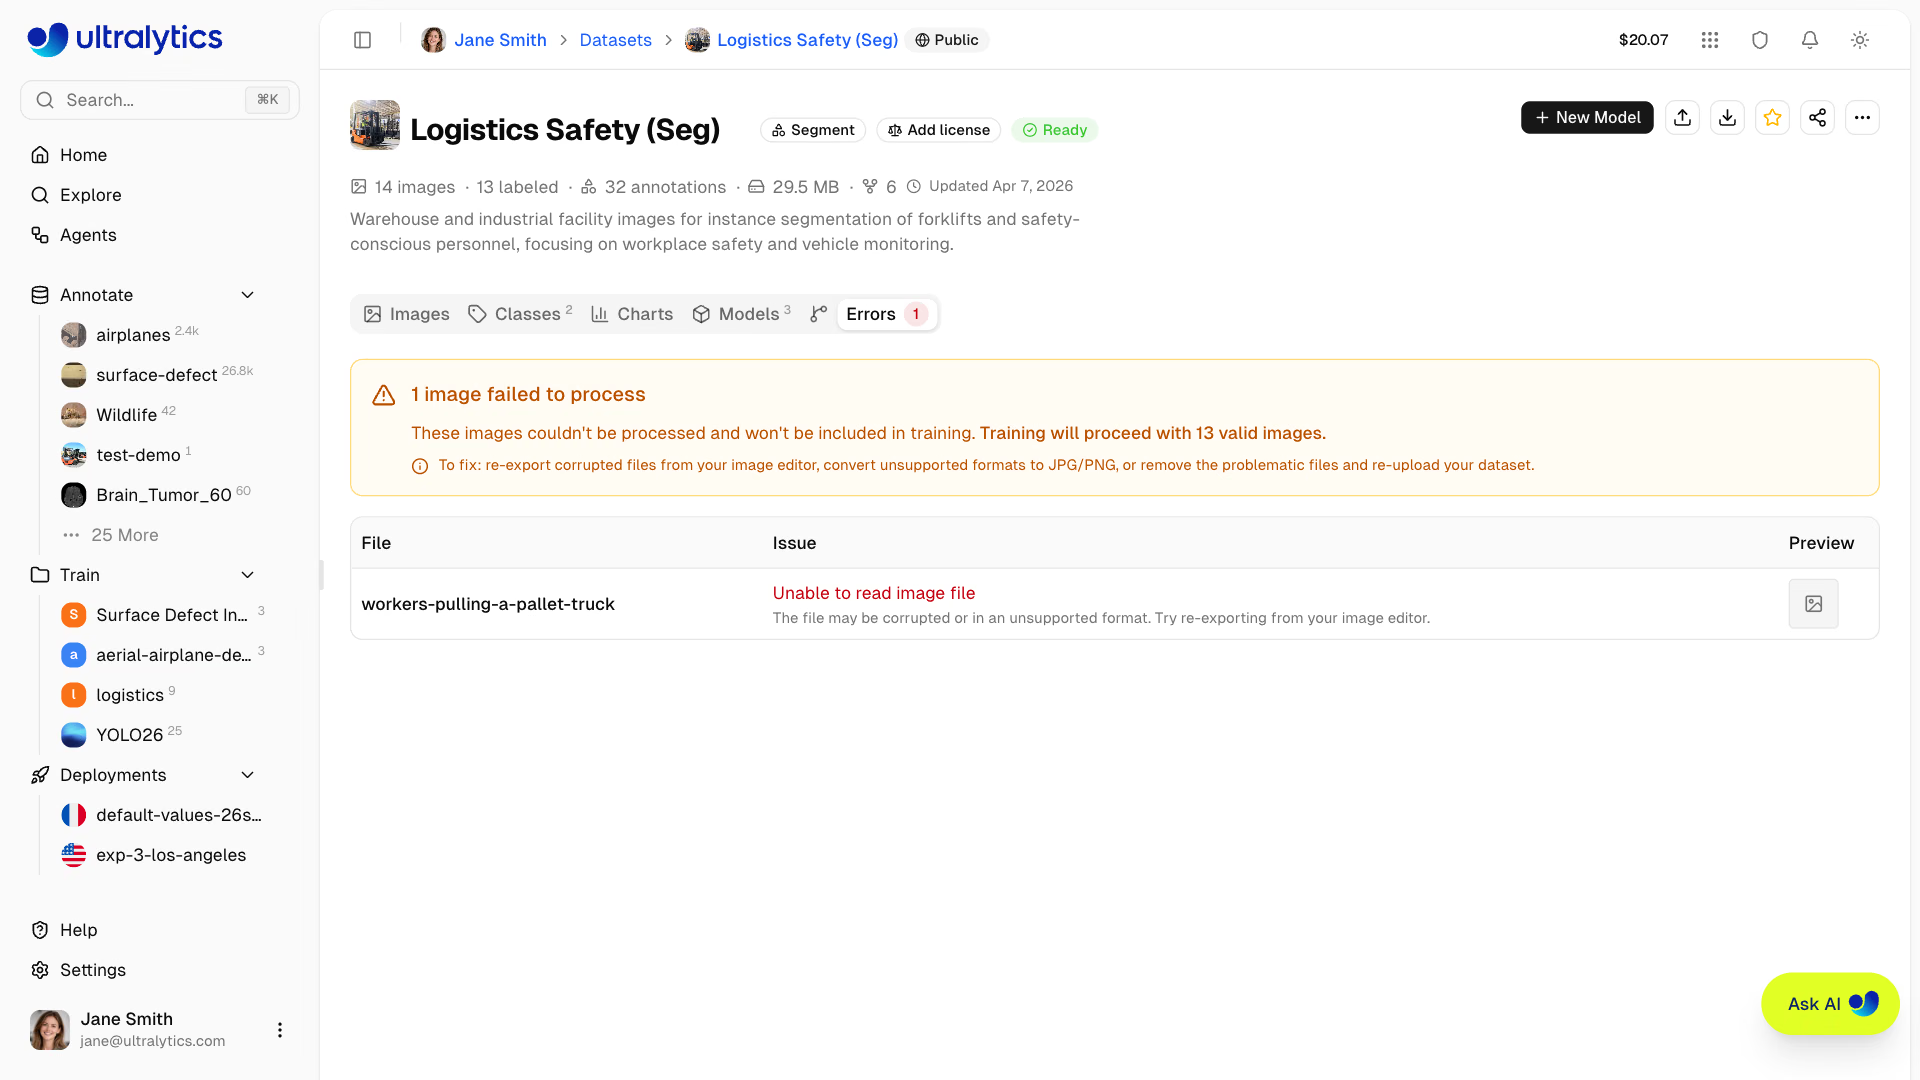
This tab appears only when one or more files fail processing.
Images that failed processing are listed here with:
- Error banner: Total count of failed images and guidance
- Error table: Filename, user-friendly error description, fix hints, and preview thumbnail
- Common errors include corrupted files, unsupported formats, images too small (min 28px), and unsupported color modes
Common Processing Errors
| Error | Cause | Fix |
|---|---|---|
| Unable to read image file | Corrupted or unsupported format | Re-export from image editor |
| Incomplete or corrupted | File was truncated during transfer | Re-download the original file |
| Unsupported image format | Format Platform cannot decode | Convert to JPG, PNG, or WebP |
| File permission error | File is locked or read-protected | Unlock the file and re-upload |
| Image too small | Minimum dimension below 28px | Use higher resolution source images |
| Unsupported color mode | CMYK or indexed color mode | Convert to RGB mode |
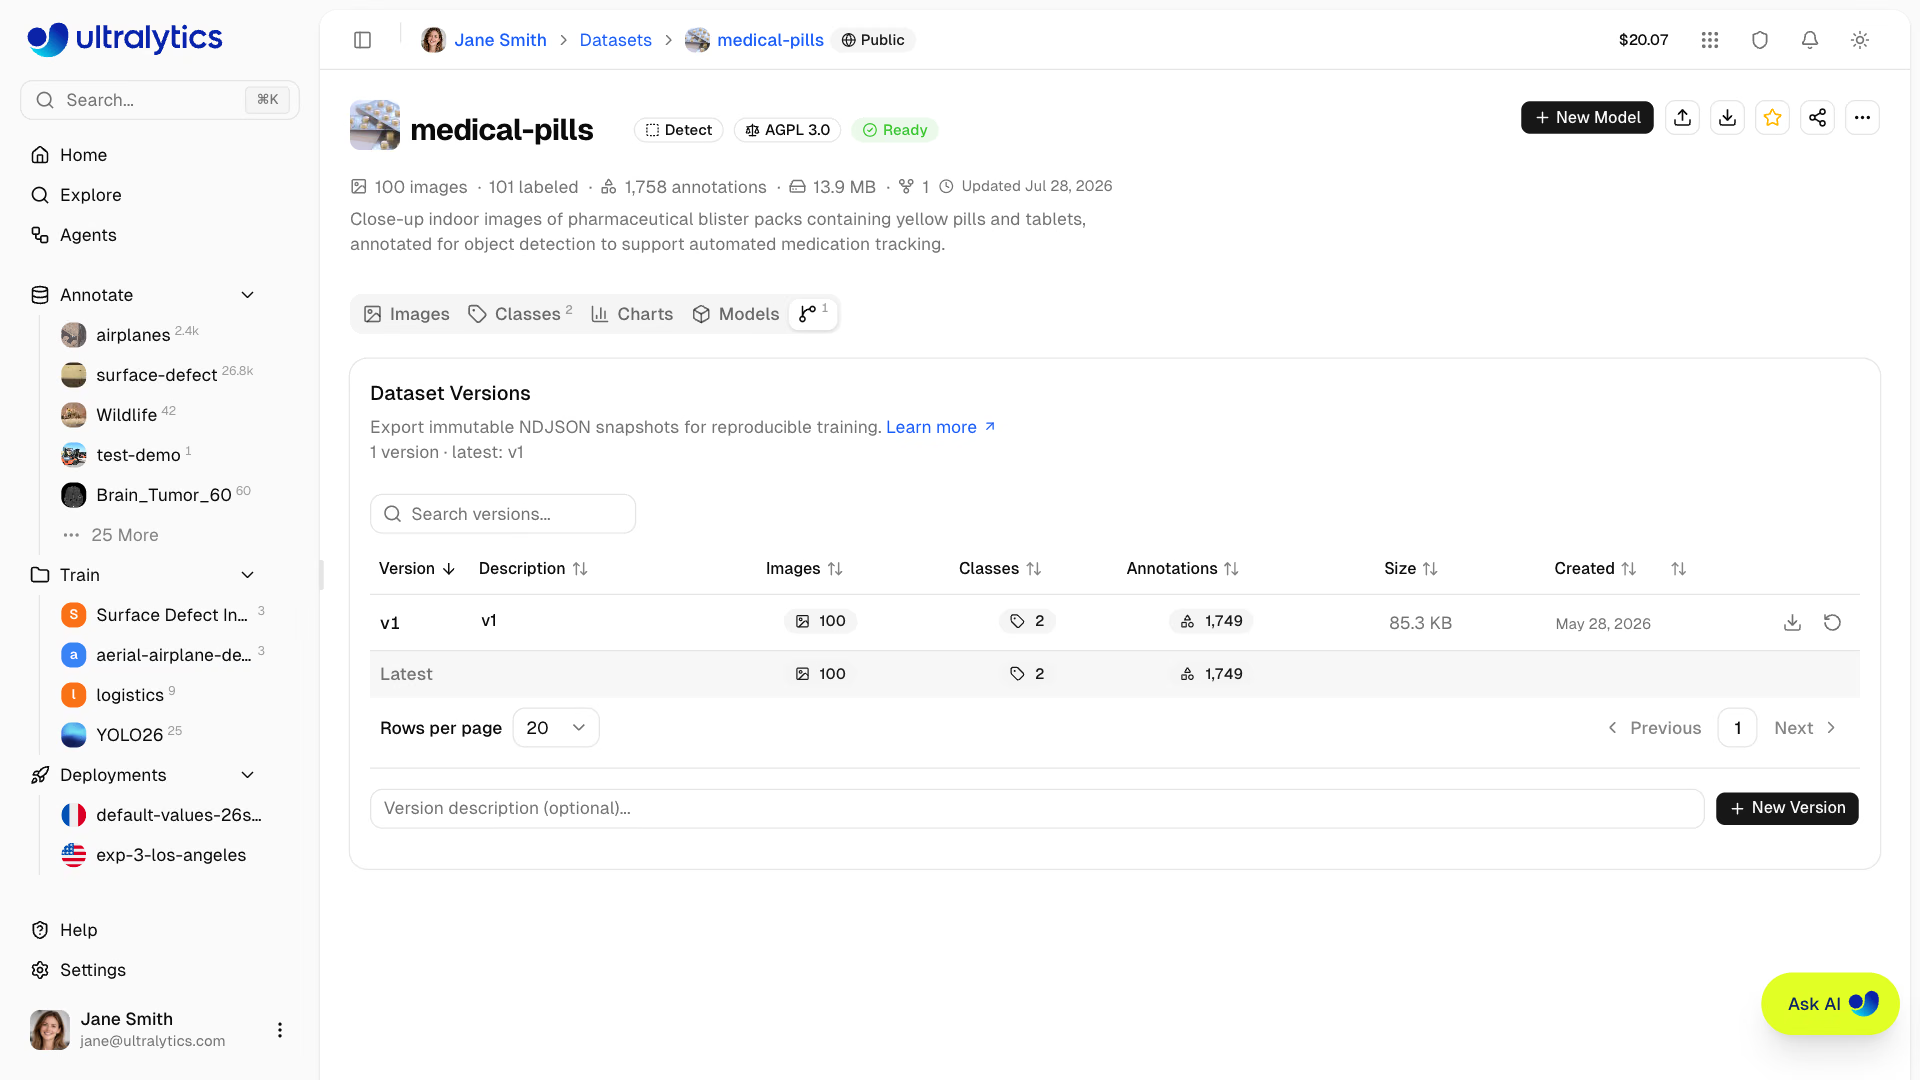
Versions Tab#
Create immutable NDJSON snapshots of your dataset for reproducible training. Each version captures image counts, class counts, annotation counts, and the storage it added at the time of creation.
| Column | Description |
|---|---|
| Version | Version number (v1, v2, ...) |
| Description | User-provided description (editable) |
| Images | Image count at time of snapshot |
| Classes | Class count at time of snapshot |
| Annotations | Annotation count at time of snapshot |
| Size | Storage this version added |
| Created | When the version was created |
| Actions | Compare, download, or restore |
To create a version:
- Open the Versions tab
- Optionally enter a description (e.g., "Added 500 training images" or "Fixed mislabeled classes")
- Click New Version
- The new version appears in the table. If the dataset matches an existing version, for example right after restoring it, that version is reused and takes the new description if you entered one
Each version is numbered sequentially (v1, v2, v3...) and is immutable — versions cannot be edited or removed, only their descriptions can be changed. Use the row actions to download or restore any version at any time.
Compare Versions#
Click the compare icon on any version after v1 to see what changed since an earlier version. Compare versions starts from the previous version; pick another one in the From menu. Chips grouped under Images, Annotations, Classes, and Settings count the images added, removed, modified, and moved to another split and the annotations added and removed, and name the classes added, removed, or renamed and any dataset settings that changed. Each changed image is listed with its badge. Select an image to see it Before and After, each side with the labels that version stored. When the images and annotations are identical, the dialog reports No changes, or No image changes when only class definitions or dataset settings differ.
Restore replaces the dataset's current images, splits, classes, and annotations with the selected snapshot and cannot be undone unless you first save the current state as another version. The dataset is locked in processing status while it rebuilds. Nothing is re-uploaded during a restore, so restores are typically fast even on large datasets.
Enable Save Dataset Version in the Cloud Training dialog to link a model to the exact dataset used for training. The Platform reuses a matching version when the dataset contents have not changed and creates a new version only when they have.
Version creation and restore are available after the dataset reaches ready status. Versions are not available for connected cloud or On Premise datasets.
Create a version before and after major changes to your dataset — adding images, fixing annotations, or rebalancing splits. This lets you compare model performance across different dataset states.
The size shown is the compressed snapshot storage the version adds: image records (URLs, splits, annotations, and metadata) and dataset settings, not the image pixels. Snapshot data unchanged since an earlier version is shared and counts toward the version that first stored it. Actual image data is stored separately and accessed via signed URLs. Snapshot storage counts against your workspace storage quota, so creating a new version fails if you have no headroom left; reusing a matching version does not.
Export Dataset#
Export your dataset for offline use with an NDJSON download from the dataset header or the Versions tab.
To export:
- Click the Download button (download icon) in the dataset header
- Download the current NDJSON snapshot directly
- Use the Versions tab when you want an immutable numbered snapshot you can re-download later
The NDJSON format stores one JSON object per line. The first line contains dataset metadata, followed by one line per image:
{"type": "dataset", "task": "detect", "name": "my-dataset", "description": "...", "bytes": 12345678, "url": "https://platform.ultralytics.com/...", "class_names": {"0": "person", "1": "car"}, "version": 1, "created_at": "2026-01-15T10:00:00Z", "updated_at": "2026-02-20T14:30:00Z"}
{"type": "image", "file": "img001.jpg", "url": "https://...", "width": 640, "height": 480, "split": "train", "metadata": {"location": {"site": "factory-1"}, "reviewed": true}, "annotations": {"boxes": [[0, 0.5, 0.5, 0.2, 0.3]]}}
{"type": "image", "file": "img002.jpg", "url": "https://...", "width": 1280, "height": 720, "split": "val"}
The optional image-level metadata object is preserved when an NDJSON file is imported into Platform. You can inspect or edit it from the image's fullscreen information panel. For programmatic archive uploads, the Ingest Dataset Data API accepts the equivalent imageMetadata path map.
Pose datasets also carry a kpt_shape field in the dataset header line, inferred from the annotations when it is not already set.
Depth exports declare "task": "depth" and "depth_scale": 1000 in the dataset line. Each image line includes a
depth.url for its paired plain uint16 PNG. Ultralytics downloads image and depth URLs concurrently and writes a
training YAML with the same scale, so the NDJSON file can be passed directly to model.train(data=...).
Image URLs in the exported NDJSON are signed and valid for 7 days. Platform reuses a cached export for up to 6 days when the dataset has not changed, so a fresh download always has at least a day of validity left. If you need new URLs sooner, change the dataset or create a new version.
Export is not available for On Premise datasets, whose image bytes never reach Platform.
See the Ultralytics NDJSON format documentation for full specification.
Image Operations#
Quick Actions#
Right-click an image in Grid or Compact view, or a single selected row in Table view, to access quick actions. Available actions depend on your edit permissions and the dataset source:
| Action | Description |
|---|---|
| Move to Split | Reassign the image to Train, Val, or Test split |
| Find Similar Images | Search public, own, and team datasets for look-alike images to add (see Find Similar Images) |
| Generate Similar Images | Create AI-generated variations, then add the ones you keep (see Generate Similar Images) |
| Blur Faces | Blur the faces detected in the image (see Blur Faces) |
| Copy / Cut | Copy or cut the image to paste it into another dataset (see Copy and Move Images) |
| Paste | Paste copied or cut images into this dataset; shown when the clipboard holds images from another dataset |
| Download | Download the original image file |
| Delete | Delete the image from the dataset |
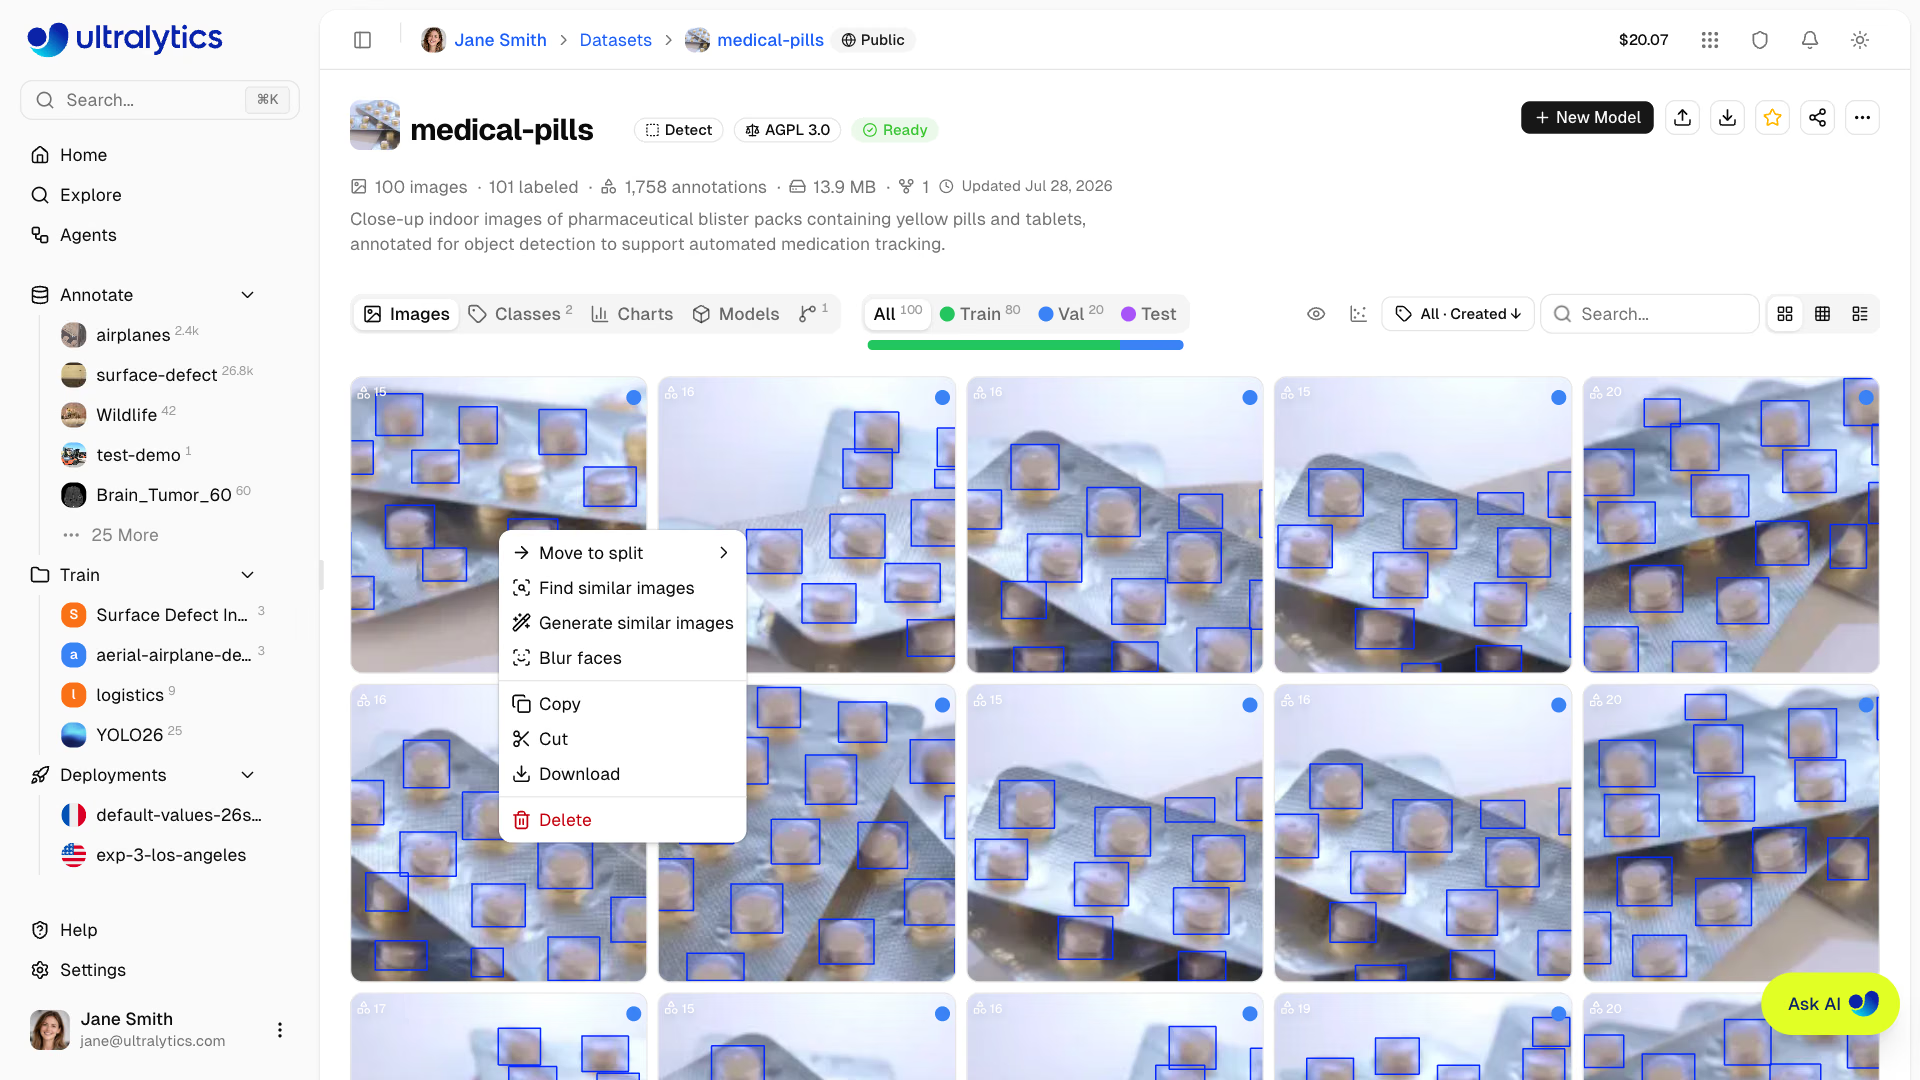
The image context menu acts on the image you clicked, except Paste, which adds the clipboard's images. For bulk operations on multiple images, use Table view with checkbox selection.
Bulk Move to Split#
Reassign selected images to a different split within the same dataset:
- Switch to Table view
- Select images using checkboxes
- Right-click to open the context menu
- Choose
Move to split> Train, Validation, or Test
You can also drag and drop images onto the split filter tabs in grid view. If moving an image would collide with an identical image already in the target split, Platform asks whether to skip, keep both, or replace.
Upload all images to one dataset, then use bulk move-to-split to organize subsets into train, validation, and test splits.
Split Redistribution#
Redistribute all images across train, validation, and test splits using custom ratios:
- Click the split bar in the dataset toolbar to open the Redistribute Splits dialog
- Adjust split percentages using any of the methods below
- Review the live image count preview to confirm the distribution
- Click Apply to randomly reassign all images according to your percentages
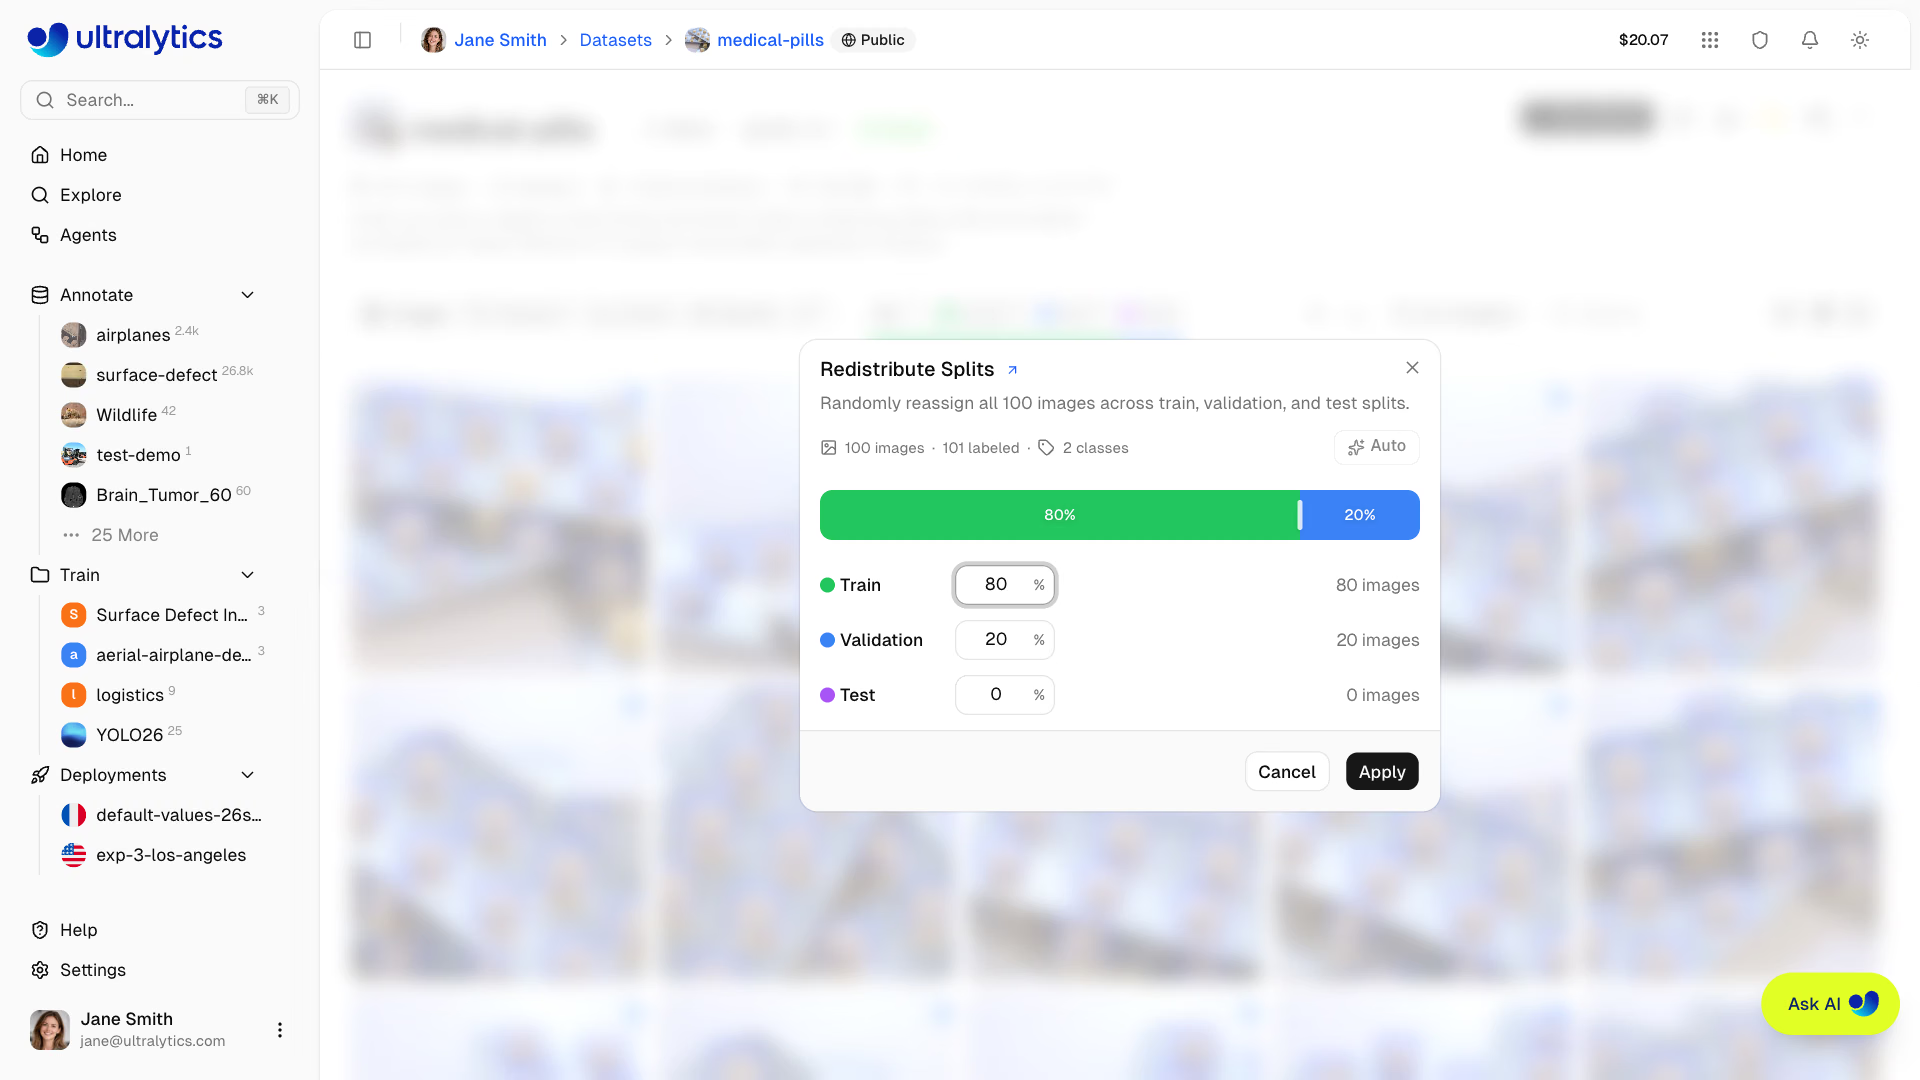
The dialog provides three ways to set your target split ratios:
| Method | Description |
|---|---|
| Drag | Drag the handles between the colored segments to visually adjust split boundaries |
| Type | Edit the percentage input for any split (the other two splits auto-rebalance proportionally) |
| Auto | One-click to instantly set an 80/20 train/validation split with the test split set to 0% |
A live preview shows exactly how many images will land in each split before you apply.
Click the Auto button to instantly set the recommended 80/20 train/validation split. This is the most common ratio for training.
Bulk Delete#
Delete multiple images at once:
- Select images in the table view
- Right-click and choose
Delete, or pressCmd/Ctrl+Delete - Confirm deletion
Copy and Move Images#
Copy or move images from one dataset you can edit into another, including a dataset in a different workspace:
- In the source dataset, right-click an image in Grid or Compact view and choose Copy or Cut, or select images in Table view and press
Cmd/Ctrl+CorCmd/Ctrl+X.Escclears the clipboard. - Open the destination dataset, right-click an image and choose Paste, or press
Cmd/Ctrl+V.
Pasted images keep their labels and splits, and images the destination already holds in the same split are skipped. Cut removes the pasted images from the source dataset; Copy leaves it unchanged. The source and destination must have the same task and compatible image channels, pose keypoint settings, and depth scale, even when the copied images have no labels. An empty destination can inherit unset image-channel and pose settings. Images cannot be pasted into a connected dataset.
Classes are matched by name, ignoring case except for one- and two-character names, and a destination without classes takes the source's class list. When a pasted image uses a class the destination does not have, the Map classes dialog asks you to map each such class to a dataset class or a new class, or to clear its Include checkbox to drop that class's labels; the images are pasted either way.
Generate Similar Images#
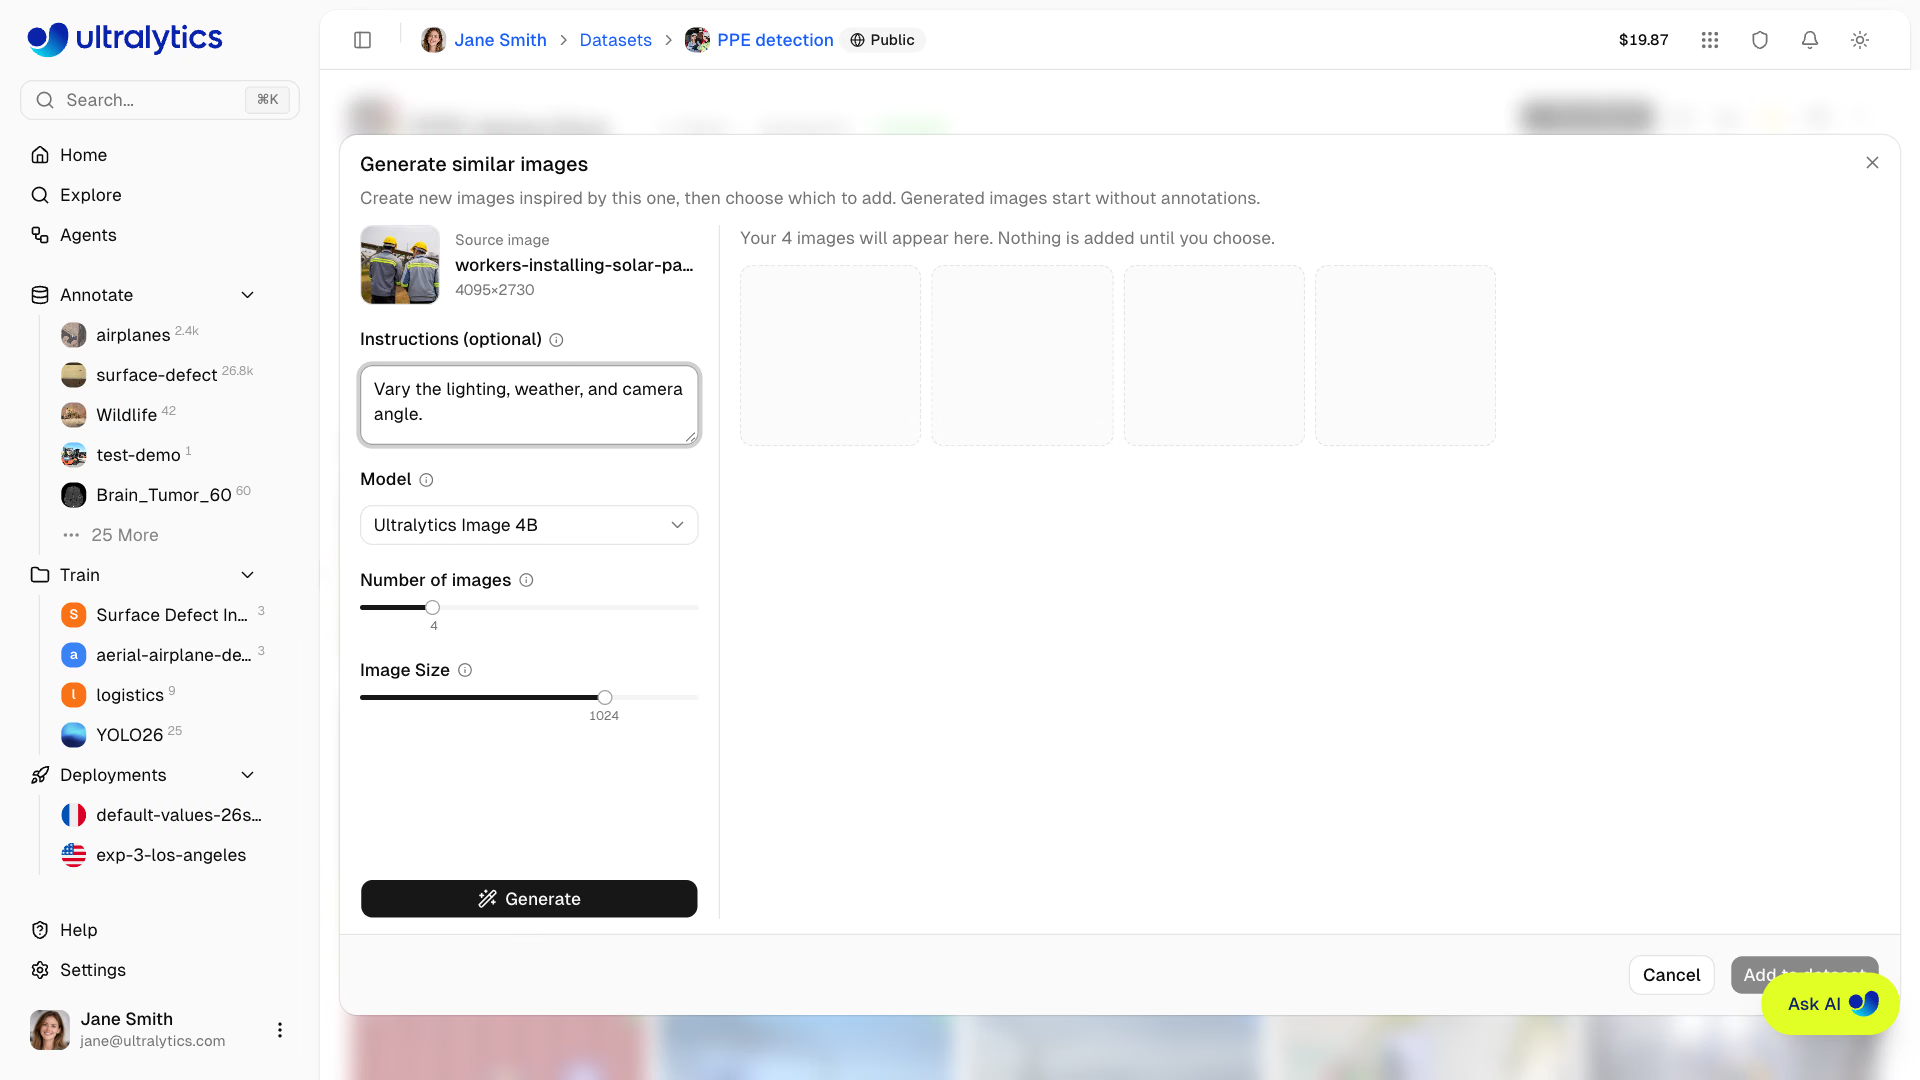
Create new training images from one you already have. In a dataset you can edit, right-click an image in Grid or Compact view (or a single selected row in Table view) and choose Generate similar images. Platform describes new scenes inspired by the image and generates one image for each, so the results share the source's subjects and style without copying it.
| Setting | Description |
|---|---|
| Model | Ultralytics Image 4B (default) is the fastest; Ultralytics Image 6B has a different style and takes longer |
| Number of images | Variations to create, from 1 to 16 (default 4) |
| Image Size | Target longest edge from 256 to 2048 px in steps of 64 (default 1024) |
| Instructions | Optional description of what to vary or keep, such as lighting, viewpoint, background, or objects |
Ultralytics Image 9B and Krea 2 Turbo are also listed, but you can select them only after you turn on Early access. Krea 2 Turbo is the slowest option. Source proportions are preserved where supported. Very narrow images may need a larger longest edge, and output dimensions are rounded and limited to the generator's supported sizes.
Click Generate, or press ⌘/Ctrl+Enter in Instructions. Images appear as they finish, all selected, and Stop ends a running batch while keeping the images that already arrived. To try other instructions or settings, change them and click Generate more: each new batch appears above the earlier ones, which keep their selection. Click an image to view it full size, clear the checkbox of any you don't want, and click Add N to dataset. The kept images are uploaded as JPEGs named after the source image, without labels, counted against your storage, and ready for annotation. They use the active split filter: choose Train before generating to add them to train. With All selected, normal upload split assignment applies, including automatic validation splitting when needed. Cancel discards the previews without adding them. Generated images follow the dataset's upload face-blurring setting. The action is unavailable on connected datasets.
Blur Faces#
In a dataset you can edit, blur the faces in its images, for example to protect the privacy of people in your data. Blur Faces is not available for connected datasets or for datasets with more than three image channels.
- One image: right-click the image in Grid or Compact view (or a single selected row in Table view), or right-click an annotation in the fullscreen viewer, and choose Blur faces.
- Whole dataset: open More actions (
⋯) on the dataset page and choose Blur faces.
The dialog first previews the detected faces on up to six images (or on the one image) without changing them. Adjust Confidence (default 0.25) and Box scale (0.5–1.5, default 1, which scales each face box around its center) to re-run the preview, then click Apply to replace the original pixels of every image in which faces are found. Images without detected faces are left unchanged, labels and splits are kept, and some faces may be missed, so review the result. Blurring does not automatically create a version snapshot. Blurring a whole dataset costs $1.00 per 1,000 processed images, with a minimum of $0.01 per run (billed as Auto-Annotation), and the dialog shows the estimate before you apply; previews and single-image blurring are free.
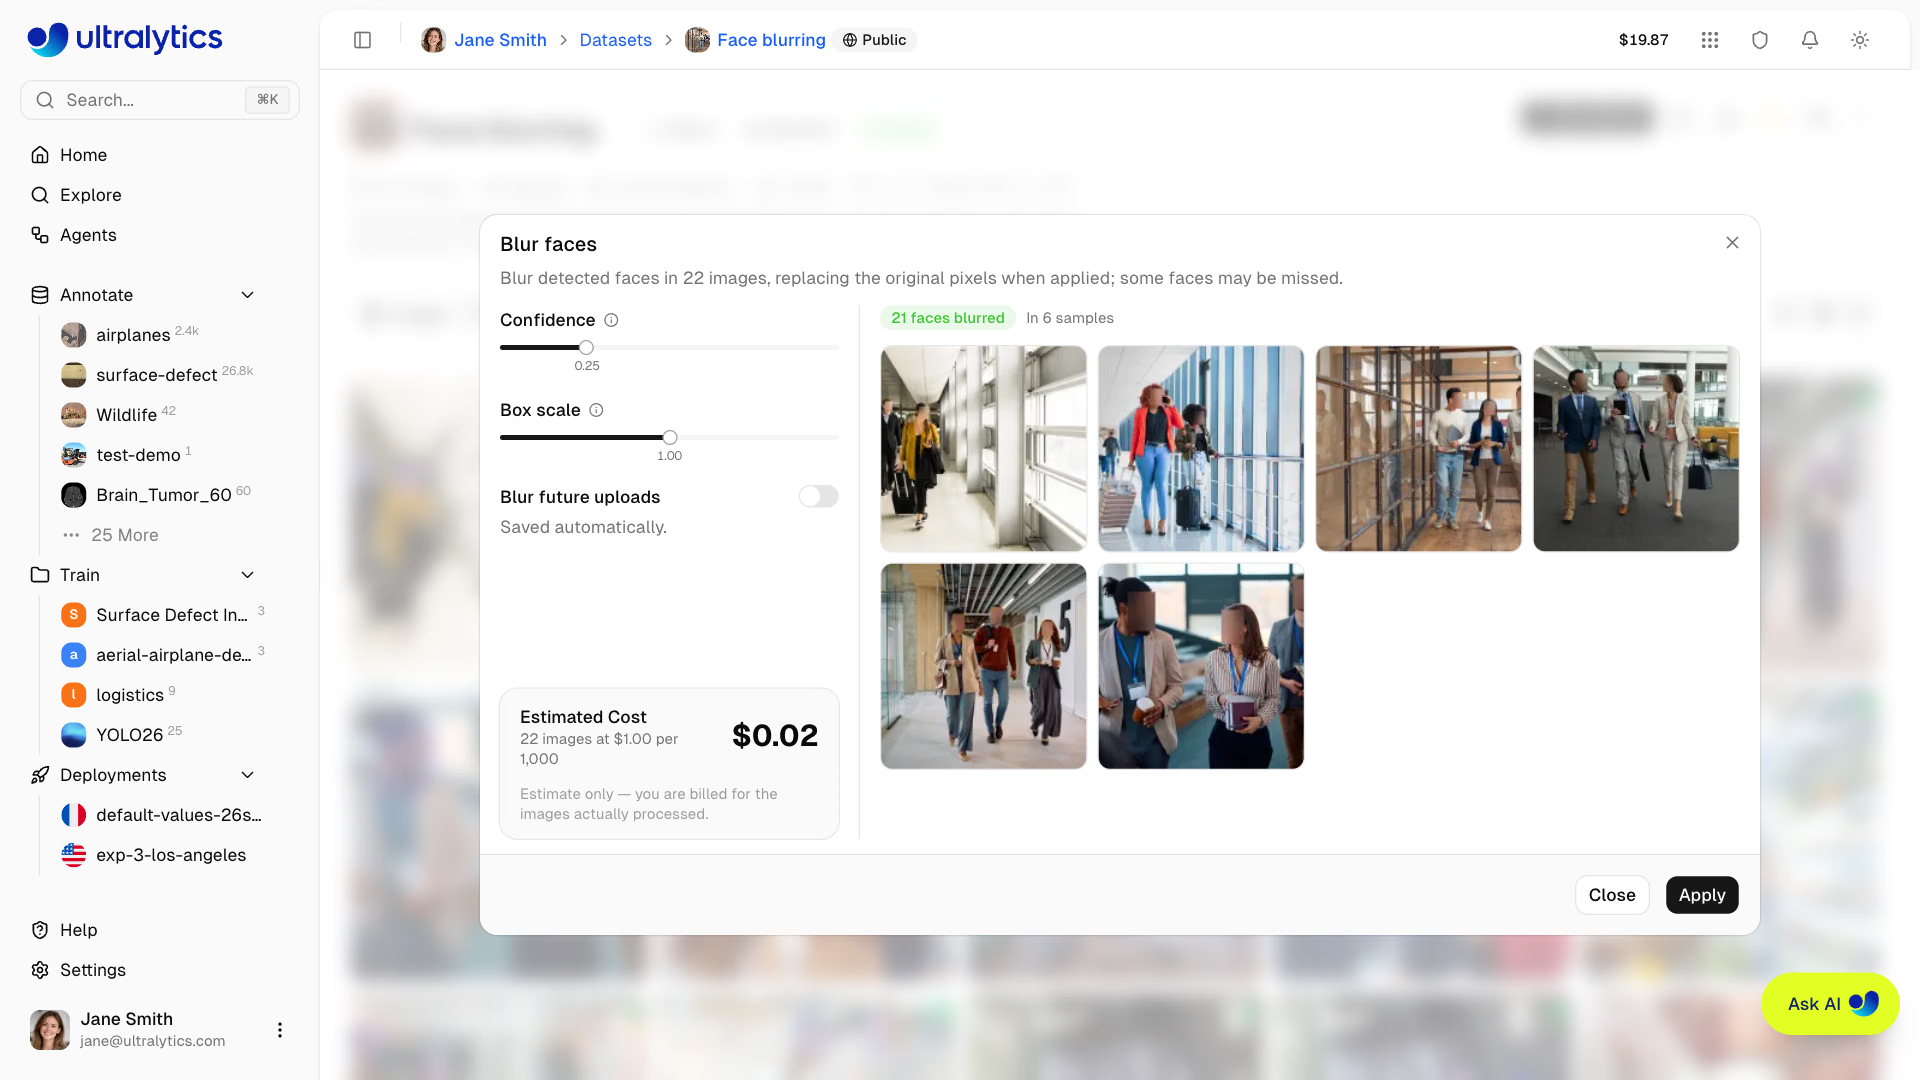
To blur faces in images as they are uploaded, turn on Blur faces when you create a dataset from Upload or URL, or Blur future uploads in the whole-dataset Blur faces dialog. The Blur future uploads switch saves immediately, even if you close the dialog without clicking Apply. Images uploaded to the dataset afterward are blurred during processing, at no charge; changing this setting does not blur images already in the dataset.
Dataset URI#
Reference Platform datasets using the ul:// URI format (see Using Platform Datasets):
ul://username/datasets/dataset-slugYou can also paste a dataset or model web URL directly (e.g. https://platform.ultralytics.com/username/datasets/dataset-slug); it is automatically rewritten to the ul:// URI. Passing a list of datasets fine-tunes one base model across each in series, for example model.train(data=["ul://username/datasets/a", "ul://username/datasets/b"]).
Use this URI to train models from anywhere:
export ULTRALYTICS_API_KEY="YOUR_API_KEY"
yolo train model=yolo26n.pt data=ul://username/datasets/my-dataset epochs=100The ul:// URI works from any environment:
- Local machine: Train on your hardware, data downloaded automatically
- Google Colab: Access your Platform datasets in notebooks
- Remote servers: Train on cloud VMs with full dataset access
Available Licenses#
The Platform supports the following licenses for datasets:
| License | Type |
|---|---|
| None | No license selected |
| CC0-1.0 | Public domain |
| PDM-1.0 | Public domain |
| CC-BY-2.5 | Permissive |
| CC-BY-3.0 | Permissive |
| CC-BY-4.0 | Permissive |
| CC-BY-NC-2.0 | Non-commercial |
| CC-BY-NC-3.0 | Non-commercial |
| CC-BY-NC-4.0 | Non-commercial |
| CC-BY-SA-3.0 | Copyleft |
| CC-BY-SA-4.0 | Copyleft |
| CC-BY-NC-SA-3.0 | Copyleft |
| CC-BY-NC-SA-4.0 | Copyleft |
| CC-BY-ND-4.0 | No derivatives |
| CC-BY-NC-ND-2.0 | Non-commercial |
| CC-BY-NC-ND-4.0 | Non-commercial |
| Apache-2.0 | Permissive |
| MIT | Permissive |
| BSD-3-Clause | Permissive |
| AGPL-3.0 | Copyleft |
| GPL-2.0 | Copyleft |
| GPL-3.0 | Copyleft |
| LGPL-3.0 | Copyleft |
| ODbL-1.0 | Copyleft |
| DbCL-1.0 | Requires ODbL |
| Research-Only | Restricted |
| Other | Custom |
When cloning a dataset with a copyleft license (AGPL-3.0, GPL-2.0, GPL-3.0, LGPL-3.0, ODbL-1.0, CC-BY-SA-3.0, CC-BY-SA-4.0, CC-BY-NC-SA-3.0, CC-BY-NC-SA-4.0), the clone inherits the license and the license selector is locked.
Visibility Settings#
Control who can see your dataset:
| Setting | Description |
|---|---|
| Private | You and permitted workspace members can access |
| Public | Anyone can view, including from the Explore page |
Visibility is set when creating a dataset in the New Dataset dialog using a toggle switch. To change it later, click the Public or Private badge next to the dataset name in the page breadcrumb; making a dataset public asks for confirmation. On Premise datasets are always private. Public datasets are visible on the Explore page.
Edit Dataset#
Dataset metadata is edited inline directly on the dataset page — no dialog needed:
- Name: Click the dataset name to edit it. Changes auto-save on blur or
Enter. Names are limited to 100 characters. - Description: Click the description (or "Add a description..." placeholder) to edit. Changes auto-save. Descriptions are limited to 1,000 characters.
- Task type: Click the task badge to select a different task type.
- License: Click the license selector to change the dataset license.
- Icon: Click the dataset icon to upload your own image, promote one of the dataset's own images to the icon, or pick a letter and color.
Each image stores annotations for all task types together. Changing the dataset task type controls which annotations are visible in the editor and included in exports and training. Annotations for other task types are preserved in the database and reappear when you switch back. Depth is the exception: its ground truth is a paired file rather than an annotation, so a dataset can only switch to or from depth while it holds no images — re-import it instead.
Custom Metadata#
Open More actions and select Information to review two sections:
- Ultralytics Metadata: Read-only Platform details such as the dataset ID, owner, task, image and annotation counts, storage region, and timestamps
- Custom Metadata: Your own JSON object for provenance, capture conditions, customer IDs, governance, or other contextual data
Workspace viewers can inspect metadata, while members with edit access can replace the custom metadata object. The serialized metadata object is limited to 500,000 characters, and each top-level key is limited to 128 characters. Save an empty object ({}) to clear custom metadata.
Clone Dataset#
When viewing a public dataset you do not own, click Clone Dataset to open the clone dialog. Review the destination workspace, name, visibility, and license, then confirm the clone. The copy includes all images, annotations, and class definitions. Public source datasets stay public by default in workspaces whose default visibility is public; Enterprise workspace clones default to private. If the original dataset has a copyleft license, the clone inherits it and the license selector is locked.
The clone dialog keeps Clone Dataset disabled while the URL is already used in the target workspace, and cloning requires enough remaining storage quota to hold the copy.
Datasets backed by cloud storage or On Premise sources cannot be cloned, because Platform does not hold their image bytes.
Star and Share#
- Star: Click the star button to bookmark a dataset. The star count is visible to all users.
- Share: For public datasets, click the share button to copy a link, grab an embed snippet, or share to social platforms.
Delete Dataset#
Delete a dataset you no longer need:
- Open More actions (the
…button) in the dataset header - Choose Delete Dataset
- Confirm in the dialog: "This will move [name] to trash. You can restore it within 30 days."
The same menu holds Information, which opens the metadata dialog described in Custom Metadata, and Refresh, which re-reads the dataset from the server.
Deleted datasets are moved to Trash — not permanently deleted. You can restore them within 30 days from Settings > Trash.
Train on Dataset#
Start training directly from your dataset:
- Click
New Modelon the dataset page - Select a project or create new
- Configure training parameters
- Start training
graph LR
    A[Dataset]:::start --> B[New Model]:::proc
    B --> C[Select Project]:::proc
    C --> D[Configure]:::proc
    D --> E[Start Training]:::out

    classDef start fill:#4CAF50,color:#fff
    classDef proc fill:#2196F3,color:#fff
    classDef out fill:#9C27B0,color:#fff
See Cloud Training for details.
FAQ#
Your data is processed and stored in your selected region (US, EU, or AP). Images are:
- Validated for format and size
- Rejected if minimum dimension is below 28px
- Normalized if larger than 4096px (preserving aspect ratio; encoded for optimized storage; TIFF stored as uploaded)
- Stored with deduplication, so identical images are kept only once
- Thumbnails generated at 256px WebP for fast browsing
Ultralytics Platform manages storage efficiently:
- Deduplication: Identical images in the same data region are stored once
- Integrity: Uploads are verified for data integrity
- Efficiency: Clones reuse stored images instead of copying them, while still counting toward the destination workspace's storage quota
- Regional: Data stays in your selected region (US, EU, or AP)
Yes. Drag files onto the dataset gallery or click the upload icon in the page header, which opens your browser's native file picker directly. New statistics are computed automatically after processing.
Yes. Copy or cut images in one dataset and paste them into another dataset you can edit; they keep their labels and splits, and Cut removes them from the source. Classes are matched by name, and the Map classes dialog handles any the destination does not have. See Copy and Move Images.
Use the bulk move-to-split feature:
- Select images in the table view
- Right-click and choose
Move to split - Select the target split (Train, Validation, or Test)
Ultralytics Platform supports YOLO labels, COCO JSON, LabelMe JSON, Ultralytics and Labelbox NDJSON, semantic PNG masks and depth maps, and raw image uploads. Pascal VOC XML labels are detected but not imported:
One
.txtfile per image with normalized coordinates (0-1 range):Task Format Example Detect class cx cy w h0 0.5 0.5 0.2 0.3Segment class x1 y1 x2 y2 ...0 0.1 0.1 0.9 0.1 0.9 0.9Semantic class x1 y1 x2 y2 ...0 0.1 0.1 0.9 0.1 0.9 0.9Pose class cx cy w h kx1 ky1 v1 ...0 0.5 0.5 0.2 0.3 0.6 0.7 2OBB class x1 y1 x2 y2 x3 y3 x4 y40 0.1 0.1 0.9 0.1 0.9 0.9 0.1 0.9Classify Directory structure train/cats/,train/dogs/Pose visibility flags: 0=not labeled, 1=labeled but occluded, 2=labeled and visible. Semantic datasets also accept PNG masks instead of polygon files (see Semantic Masks).
Yes. Each image stores annotations for all 6 annotation task types (detect, segment, semantic, classify, pose, OBB) together. You can switch the dataset's active task type at any time without losing existing annotations. Only annotations matching the active task type are shown in the editor and included in exports and training — annotations for other tasks are preserved and reappear when you switch back.
Yes:
Limit Value Classes per dataset 25,000 Annotations per image 10,000 Coordinates per annotation 10,000 Dataset name 100 characters Dataset description 1,000 characters Custom metadata 500,000 serialized characters Metadata top-level key 128 characters Datasets that read from cloud storage or On Premise sources keep their pixels outside Platform, so the features that need Platform-owned copies of the image bytes are unavailable:
Feature Cloud-connected On Premise Smart and Batch Annotation Unavailable Unavailable Clustering analysis Unavailable Unavailable Cloning Unavailable Unavailable Version snapshots Unavailable Unavailable NDJSON export Available Unavailable Semantic PNG mask import Unavailable Available Blur faces Unavailable Unavailable Find similar images Unavailable Unavailable Generate similar images Unavailable Unavailable Pasting images into the dataset Unavailable Unavailable Browsing, manual annotation, class management, splits, statistics, and training all work normally.